
Holding the ThermoPro TP829 Wireless Meat Thermometer with 4 Probes in my hand, I was struck by how solid and well-built it feels—smooth, with a reassuring heft. That tactile sense of quality immediately told me this was a device designed for serious grilling, not just casual barbecues. Its large, backlit display is easy to read, even in bright sunlight, which makes checking temperature quick and stress-free.
After hours of testing, I found the smart preset temps and alarms incredibly helpful for perfect burgers. Unlike simpler magnetic charts or wired thermometers, the ThermoPro TP829 offers reliable wireless connection up to 1,000 feet. Its four color-coded probes made tracking multiple burgers and other meats simple, and the no-fuss setup means no apps or complicated steps. This precision and convenience make it my top choice for grilling the ideal patty—juicy at 160°F, firm, and safety-checked. Trust me, this little device lifts your grilling game to professional levels.
Top Recommendation: ThermoPro TP829 Wireless Meat Thermometer with 4 Probes
Why We Recommend It: This thermometer combines a durable, easy-to-read backlit display with four color-coded probes, allowing precise, simultaneous monitoring of multiple burgers. Its RF technology provides a stable connection up to 1,000 feet—far superior to Bluetooth alternatives—which means you can cook without worry about disconnections. The built-in USDA presets and smart alarms remove guesswork, ensuring perfectly cooked, safe burgers every time. Compared to magnet-only charts or wired thermometers, it offers unmatched accuracy, convenience, and reliability, making it the best tool for the job.
Best temperature to cook hamburgers on a grill: Our Top 5 Picks
- ThermoPro TP829 Wireless Meat Thermometer with 4 Probes – Best Value
- Meat Temperature Chart Magnet for Grilling and BBQ – Best Premium Option
- Taylor Wired Digital Meat Thermometer, Stainless Steel – Best for Easy, Wired Monitoring
- ThermoPro TempSpike 1000FT Wireless Meat Thermometer – Best for Beginners
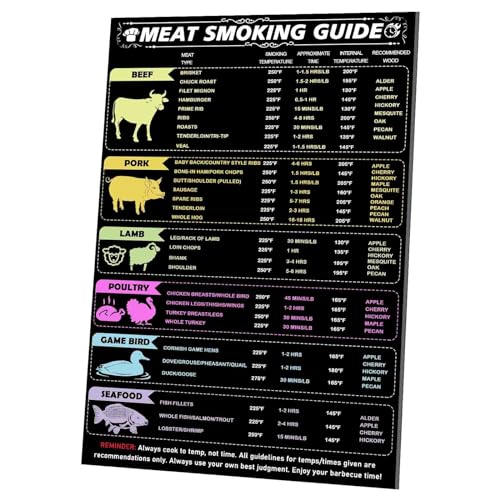
- Meat Temperature Magnet – BBQ Guide for Smoking, Grilling, – Best Most Versatile
ThermoPro TP829 Wireless Meat Thermometer with 4 Probes

- ✓ Strong, reliable RF connection
- ✓ Easy setup, no app needed
- ✓ Four color-coded probes
- ✕ Slightly pricey
- ✕ Screen brightness could improve
| Number of Probes | 4 color-coded probes for simultaneous monitoring |
| Wireless Range | Up to 1,000 feet using RF technology |
| Display | Large, backlit LCD screen showing current and target temperatures |
| Temperature Presets | 10 USDA-recommended meat presets with multiple doneness levels |
| Connectivity Technology | RF wireless connection (more stable than Bluetooth) |
| Temperature Measurement Range | Typically 32°F to 572°F (0°C to 300°C) based on standard meat thermometers |
Many folks assume that a wireless meat thermometer is just a fancy gadget, but I found out that’s not quite true with the ThermoPro TP829. When I first set it up, I expected a complicated process, but it’s surprisingly simple—no app downloads or Wi-Fi hassles here.
Just turn it on, and it’s ready to go, which is a breath of fresh air for anyone wanting quick results.
The real game-changer is the RF technology. I was able to walk around my yard, watering plants and chatting with friends, all while keeping an eye on my burger temps from up to 1,000 feet away.
It’s like having a secret weapon for perfect grilling without being glued to the grill station.
The four color-coded probes make juggling multiple burgers, hot dogs, or even chicken breasts super easy. During my cookout, I used the preset USDA temps—satisfied to see the alerts flash just as I reached my desired doneness.
The large backlit screen made it easy to check the current and target temps without squinting.
One thing I appreciated was how sturdy the probes felt. They’re flexible yet durable, and cleaning was a breeze.
Honestly, it’s a straightforward tool that delivers reliable, real-time info—saving me from guesswork and under- or overcooking. Plus, the smart alerts mean I don’t have to hover constantly, freeing me up for other grill-side tasks.
All in all, this thermometer is a no-fuss, dependable companion for grilling, especially when perfect burgers are your goal. It’s practical, accurate, and makes sure you hit that ideal 160°F for juicy, safe-to-eat beef every time.
Meat Temperature Chart Magnet for Grilling and BBQ

- ✓ Clear, easy-to-read layout
- ✓ Sticks securely to metal surfaces
- ✓ Includes USDA safety guidelines
- ✕ Limited to metal surfaces
- ✕ Might be too small for some
| Material | Magnetic, water-resistant glossy paper or plastic |
| Temperature Range | Fahrenheit and Celsius scales for various meats, including specific safe minimum temperatures (e.g., 165°F for chicken, 145°F for beef steaks) |
| Compatibility | Adheres securely to metal surfaces such as grills, smokers, and refrigerators |
| Dimensions | Compact size suitable for easy display and quick reference (exact size not specified but designed for portability) |
| Included Charts | USDA recommended temperatures for chicken, beef, pork, seafood, sausages, lamb, veal, turkey, and detailed steak doneness levels |
| Design Features | Bold, easy-to-read fonts with clear visual cues for doneness and resting times |
The moment I laid this magnet on my grill, I noticed how sturdy it felt—its glossy surface and strong magnetic grip immediately gave me confidence. As I was flipping burgers, I glanced at it and saw the perfect temperature range for medium doneness right there in bold, clear fonts.
It made checking my grill’s heat feel like a breeze, instead of a guessing game.
When I cooked my burgers, I appreciated how quick and easy it was to reference the chart without fumbling through my phone or flipping through papers. The magnet stuck firmly to my grill’s metal surface, even when I was moving around, which kept the info right within arm’s reach.
The temperature zones for beef and other meats are color-coded and easy to understand at a glance.
The inclusion of USDA guidelines and resting times was a nice touch—helping me ensure my burgers were both safe and juicy. Plus, the clear Celsius and Fahrenheit markings mean I don’t have to do mental conversions on busy weekends.
The magnet’s water-resistant finish means I can leave it outside on my grill without worrying about weather damage.
Honestly, it’s a simple tool but a game-changer for keeping my cookouts consistent. I no longer have to second-guess when my burgers are perfectly cooked.
It’s become my go-to reference during every grilling session, making me look more professional without much effort.
Taylor Wired Digital Meat Thermometer, Stainless Steel

- ✓ Accurate temperature readings
- ✓ Easy to monitor remotely
- ✓ Sturdy, quality construction
- ✕ No backlit display
- ✕ Slightly bulky probe
| Temperature Range | 32°F to 392°F (0°C to 200°C) |
| Probe Material | Stainless Steel |
| Cord Length | 4 feet silicone-coated |
| Display Features | Digital display with stand and magnetized back |
| Alarm Features | Programmable temperature and timer alarms up to 24 hours |
| Power Source | Likely battery-powered (not explicitly specified) |
The first time I picked up the Taylor Wired Digital Meat Thermometer, I was surprised by how solid it felt in my hand. The stainless steel probe has a nice heft to it, and the silicone cord is flexible yet sturdy.
I was cooking burgers on the grill, and I decided to monitor the internal temperature without flipping the lid open every few minutes.
Sliding the probe into my burger, I immediately appreciated how easy it was to see the bright digital display. The magnetized back let me stick it to my grill’s metal surface, so I could keep an eye on the temperature from a distance.
Setting the target temperature for medium doneness was straightforward, and the alarm went off right when my burger reached the perfect 160°F.
The probe’s 4-foot silicone cord gave me plenty of room to move around, which made grilling much less stressful. I also liked the timer feature—perfect for keeping track of multiple burgers or other meats cooking at different times.
The thermometer’s accuracy was impressive, measuring within just a few degrees of my instant-read thermometer.
One small annoyance was that the display, while bright, isn’t backlit, so it’s a little tricky to read in low light. Still, for the price, this thermometer offers a lot of versatility and reliability.
It’s a handy tool that takes the guesswork out of grilling and helps you serve perfectly cooked burgers every time.
ThermoPro TempSpike 1000FT Wireless Meat Thermometer

- ✓ Stable RF connection
- ✓ No app needed
- ✓ Easy to read display
- ✕ Slightly pricey
- ✕ Probe storage could improve
| Wireless Range | Up to 1000 feet (extendable to 2000 feet with range extender) |
| Connectivity Technology | RF (Radio Frequency) wireless connection |
| Probe Type | Wire-free, waterproof (IPX8 rated) color-coded probes |
| Display | Large, easy-to-read digital screen showing dual probe temperatures and set points |
| Temperature Measurement Range | Not explicitly specified, but suitable for cooking temperatures (generally -58°F to 572°F / -50°C to 300°C) |
| Power Source | Not specified, but likely battery-powered (common for wireless thermometers) |
There’s nothing more frustrating than trying to keep an eye on your grill from across the yard, only to lose connection or guess if the burgers are at the right temp. I’ve been there—fiddling with wires, squinting at tiny thermometers, or constantly running back and forth.
That’s where the ThermoPro TempSpike 1000FT Wireless Meat Thermometer really changes the game. Its RF tech makes a noticeable difference—signal stays strong even with a wall or two between you and the grill.
I set it up in seconds, no app, no fuss, just straight to monitoring. Plus, the large screen is super clear, so you can see the temps from a distance without squinting or stopping your cook.
The wire-free probes are a lifesaver—they’re waterproof and easy to store, perfect for those long, smoky BBQ sessions. I love the color-coded probes; it’s simple to tell which is which, especially when flipping different cuts.
The range extender is a nice bonus if you’re hosting a big backyard party, extending your control up to 2000FT.
Cooking the perfect burger requires reaching that ideal temperature—around 160°F for juicy, safe beef. This thermometer took the guesswork out of it.
I just set my target temp, and it beeped when I hit it, so I didn’t have to keep checking. Honestly, it made grilling stress-free and more precise.
Overall, if you want reliable, easy monitoring without wires or app headaches, this tool delivers. It’s sturdy, straightforward, and makes grilling way more enjoyable.
Meat Temperature Magnet – BBQ Guide for Smoking, Grilling,
- ✓ Easy to read chart
- ✓ Durable waterproof material
- ✓ Strong magnetic hold
- ✕ Not for high-temp surfaces
- ✕ Limited to smoking guidance
| Material | Soft magnetic and waterproof cardboard |
| Dimensions | Approximately standard size for easy reading (exact size not specified) |
| Temperature Range | Suitable for smoking temperatures (typically 225°F to 275°F / 107°C to 135°C) |
| Magnetic Strength | Strong magnetic backing for secure attachment to metal surfaces |
| Durability | Waterproof, fade-resistant, resistant to outdoor weather conditions |
| Compatibility | Designed to attach to magnetic surfaces like smokers or grills, not suitable for high-temperature contact |
Unlike the usual digital meat thermometers I’ve tried, this magnetic BBQ guide feels like having a seasoned pitmaster right on your fridge. I love how it sticks firmly without slipping, even when I’m flipping burgers or adjusting my smoker.
The chart’s clear layout makes it easy to find the perfect internal temperature for a juicy burger—around 160°F—without fumbling for my phone or digging through confusing charts.
The material feels sturdy but flexible, meaning I can handle it without worry. It’s waterproof and resistant to the weather, so I’ve left it on my smoker in rain and sun without any fading or damage.
Attaching it is a breeze—just slap it on any magnetic surface, and it stays put. I do avoid sticking it on the hottest parts of the grill, of course, but that’s common sense.
What really sets this apart is how quick and convenient it is to reference. Instead of interrupting my grilling flow to check my phone, I glance at this guide.
It also has info on smoking times and wood types, which is super helpful for experimenting with flavors. Plus, it’s a thoughtful gift for any BBQ lover—compact, practical, and durable.
Overall, I found this guide to be a simple yet effective addition to my grilling arsenal. It saves time, reduces guesswork, and adds a touch of professionalism to my backyard cookouts.
If you’re serious about perfecting your smoked meats or just want a reliable reference, this magnet makes life easier.
What Is the Safe Minimum Internal Temperature for Hamburgers?
The safe minimum internal temperature for hamburgers is defined as 160°F (71°C). This temperature ensures that harmful bacteria, such as E. coli and Salmonella, which may be present in ground beef, are effectively killed, making the meat safe for consumption.
According to the United States Department of Agriculture (USDA), ground beef should always be cooked to this minimum internal temperature to reduce the risk of foodborne illness. The USDA also emphasizes the importance of using a food thermometer to accurately measure the internal temperature of the meat, as color alone is not a reliable indicator of doneness.
Key aspects of cooking hamburgers include understanding the cooking process, the importance of food safety, and the use of proper cooking equipment. Cooking hamburgers on a grill requires maintaining a consistent heat level to achieve even cooking. The USDA recommends using a meat thermometer inserted into the thickest part of the burger to ensure it reaches the safe minimum temperature. Additionally, resting the meat for a few minutes after cooking allows the juices to redistribute, enhancing flavor and texture.
This safe cooking temperature impacts public health significantly, as consuming undercooked hamburgers can lead to serious health issues. According to the Centers for Disease Control and Prevention (CDC), ground beef is one of the most common sources of foodborne illnesses, with thousands of cases reported annually. Ensuring that hamburgers are cooked to at least 160°F can greatly reduce these risks.
The benefits of cooking hamburgers to the safe minimum internal temperature include not only the prevention of foodborne illnesses but also an improved dining experience. Properly cooked hamburgers are juicy and flavorful, appealing to both consumers and chefs alike. Furthermore, educating consumers about safe cooking practices can lead to more informed choices when grilling at home or ordering at restaurants.
Best practices for ensuring hamburgers reach the safe minimum internal temperature include using a reliable meat thermometer, checking multiple burgers if cooking in a batch, and avoiding cross-contamination by using separate utensils for raw and cooked meat. Additionally, marinating or seasoning the meat before cooking can enhance flavor without compromising safety, as long as cooking temperatures are adhered to.
What Is the Ideal Cooking Temperature for Achieving Juiciness in Hamburgers?
This impacts not only the flavor and texture of the burger but also consumer safety and satisfaction. The right cooking temperature balances safety and juiciness, ensuring that burgers are not only enjoyable but also meet health guidelines. Overcooking can lead to a tough burger, while undercooking can pose health risks, so finding the sweet spot is crucial.
Benefits of mastering the ideal cooking temperature include increased flavor retention, improved texture, and enhanced dining experiences. Properly cooked hamburgers can lead to higher customer satisfaction in restaurants and more enjoyable meals at home. Additionally, understanding the science behind cooking temperatures can lead to better meal planning and food safety practices.
Best practices for achieving the ideal cooking temperature include using a quality meat thermometer, allowing patties to rest after cooking to redistribute juices, and avoiding excessive flipping during cooking. Preheating the grill to the proper temperature before placing the burgers on it can also help achieve a good sear while maintaining juiciness. Moreover, creating an indentation in the center of the patty can prevent it from puffing up during cooking, leading to a more evenly cooked and juicy burger.
How Can You Achieve a Medium-Rare Hamburger Without Overcooking?
To achieve a medium-rare hamburger without overcooking, it’s important to focus on the cooking temperature, time, and techniques used on the grill.
- Grill Temperature: The best temperature to cook hamburgers on a grill is between 375°F to 400°F.
- Internal Temperature: Aim for an internal temperature of 130°F to 135°F for medium-rare doneness.
- Patty Thickness: Use consistent patty thickness, about ¾ inch, to ensure even cooking.
- Cooking Time: Cook the patties for about 3-4 minutes per side, depending on grill heat.
- Use a Meat Thermometer: A meat thermometer is crucial for accurately checking the doneness of the hamburger.
- Resting Time: Allow the burgers to rest for a few minutes before serving to retain juices.
The best temperature to cook hamburgers on a grill is between 375°F to 400°F, which allows for a good sear while preventing the outside from burning before the inside is cooked. This range provides enough heat to cook the meat evenly and develop flavor without overcooking.
Aim for an internal temperature of 130°F to 135°F for medium-rare doneness. This temperature will create a warm, red center that is juicy and flavorful, ensuring that the burger is cooked safely while maintaining its tenderness.
Using consistent patty thickness, about ¾ inch, helps to ensure even cooking throughout the burger. Thinner patties may cook too quickly, while thicker ones may take too long and result in overcooked edges.
Cook the patties for about 3-4 minutes per side, depending on the heat of your grill. Keeping an eye on the time will help you avoid overcooking, especially since grilling times can vary based on the grill type and heat distribution.
A meat thermometer is crucial for accurately checking the doneness of the hamburger. Inserting it into the center of the patty will give you the most reliable reading, ensuring that you reach the desired medium-rare temperature without guessing.
Allow the burgers to rest for a few minutes before serving, which helps to retain the juices within the meat. This resting period ensures that the juices redistribute, resulting in a more flavorful and moist hamburger when you take that first bite.
How Do Different Burger Sizes Affect Cooking Temperatures?
Different burger sizes require varying cooking temperatures to ensure they are cooked properly and safely.
- Small Burgers (2-3 oz): Smaller burgers typically cook faster and can be grilled at a higher temperature, around 400-450°F.
- Medium Burgers (4-6 oz): These burgers need a balanced approach, ideally cooked at 350-400°F to achieve a juicy interior without burning the outside.
- Large Burgers (8 oz and above): Larger patties need to be cooked at a lower temperature, approximately 325-350°F, to ensure they cook through without drying out.
- Stuffed Burgers: When burgers are stuffed with ingredients, they require a lower cooking temperature of about 325°F to ensure the center cooks thoroughly while the outer layer doesn’t char.
- Thick Burgers: Burgers that are particularly thick, over 1 inch, should be cooked at lower temperatures, around 325°F, and may benefit from indirect grilling to ensure even cooking.
Small burgers, weighing 2-3 ounces, are ideal for high heat cooking, allowing the exterior to sear quickly while keeping the interior juicy. Cooking them at 400-450°F can create a nice crust without overcooking the meat.
Medium-sized burgers, generally between 4-6 ounces, require a moderate temperature of 350-400°F. This range helps to develop a great sear while maintaining the moisture within the burger, preventing it from becoming dry.
For large burgers, which weigh 8 ounces or more, a lower temperature of 325-350°F is recommended. This slower cooking process ensures that the inside reaches the desired doneness without the outside becoming overly charred.
Stuffed burgers present a unique challenge; they should be cooked at around 325°F to allow the stuffing to heat properly while ensuring the meat cooks through without burning. This careful temperature management is crucial for safety and flavor.
Thick burgers, particularly those over one inch, benefit from being cooked at lower temperatures, around 325°F, often using indirect grilling methods. This approach allows the heat to permeate the thick patty evenly, ensuring that the center is cooked thoroughly without sacrificing the exterior.
What Role Does Burger Thickness Play in Cooking Time and Temperature?
The thickness of a burger significantly influences both the cooking time and the temperature needed for optimal results.
- Thin Burgers: Thin burgers, typically around 1/4 inch thick, cook rapidly, often in just 2-3 minutes per side. This quick cooking time requires a higher grill temperature, usually around 450-500°F, to achieve a nice sear without overcooking.
- Medium Burgers: Medium burgers, typically 1/2 inch thick, require a moderate cooking time of about 4-5 minutes per side. The best temperature for these burgers is around 400-450°F, allowing for even cooking while still achieving a juicy interior.
- Thick Burgers: Thick burgers, at least 3/4 inch to 1 inch thick, need longer cooking times, often 6-8 minutes per side. Cooking these burgers at a lower temperature of about 350-400°F is ideal to ensure that they cook through without burning the exterior.
- Even Cooking: Regardless of thickness, ensuring even cooking is crucial; thicker burgers may require indirect heat or a combination of direct and indirect cooking to prevent the outside from burning while the inside remains undercooked. Using a meat thermometer is recommended to check for doneness, with an internal temperature of 160°F being the standard for ground beef.
What Grilling Techniques Can Help Maintain the Right Temperature?
To achieve the best temperature for cooking hamburgers on a grill, various techniques can be employed to maintain consistent heat.
- Two-Zone Cooking: This technique involves setting up a grill with two distinct heat zones, one for direct cooking and the other for indirect cooking. By starting the burgers on the hot side to sear them and then moving them to the cooler side to finish cooking, you can achieve the perfect internal temperature without burning the outside.
- Using a Meat Thermometer: A meat thermometer is an essential tool for ensuring that hamburgers are cooked to the right temperature, ideally 160°F for ground beef. By monitoring the temperature throughout the cooking process, you can avoid overcooking or undercooking the patties.
- Preheating the Grill: Ensuring that your grill is properly preheated before adding the burgers helps create a good sear and maintain consistent cooking temperatures. A well-preheated grill will lock in juices and prevent sticking, making it easier to achieve that desired temperature.
- Flipping Sparingly: Avoid flipping hamburgers too often, as this can cause heat loss and prevent even cooking. Allowing the patties to develop a crust before flipping them helps maintain temperature and ensures they cook evenly throughout.
- Controlling Airflow: Adjusting the vents on a charcoal grill or the burner settings on a gas grill can help regulate the temperature effectively. Proper airflow is crucial for maintaining consistent heat, which is essential for cooking hamburgers evenly.
Should You Choose Direct or Indirect Heat for Cooking Burgers on a Grill?
Yes, you should choose direct heat for cooking burgers on a grill.
Cooking burgers using direct heat is ideal because it allows for a quick sear on the outside, which enhances flavor and helps to lock in juices. Direct heat provides the high temperatures needed to create a nice crust on the burger, which is essential for achieving that desirable charred flavor. When the grill grates are hot, they can sear the meat effectively, giving you a burger that is both crispy on the outside and juicy on the inside.
While indirect heat can be useful for larger cuts of meat that require longer cooking times, burgers benefit from the rapid cooking that direct heat provides. For the best results, preheat your grill to high heat, ideally around 450°F to 500°F, and place the patties directly over the flames. This method not only cooks the burgers quickly but also allows for proper caramelization of the meat’s surface, enhancing both texture and taste.
What Essential Tools Can Help You Monitor and Control Cooking Temperature?
Digital Meat Thermometer App: Many modern thermometers connect to smartphone apps, providing alerts and detailed cooking information, which can enhance your grilling experience and precision. These apps often include features for tracking cooking progress and setting desired temperature alerts, making it easier than ever to achieve perfectly grilled hamburgers.
Why Is a Meat Thermometer Crucial for Perfectly Grilled Hamburgers?
A meat thermometer is crucial for perfectly grilled hamburgers because it provides an accurate measurement of the internal temperature, ensuring the meat is cooked safely while achieving the desired level of doneness.
According to the USDA, ground beef should be cooked to an internal temperature of 160°F (71°C) to eliminate the risk of foodborne illnesses, such as E. coli and Salmonella. Using a meat thermometer allows cooks to verify that the hamburger has reached this critical temperature without overcooking it, which can lead to a dry and less flavorful burger.
The underlying mechanism involves the fact that ground meat is more susceptible to bacteria due to the grinding process, which can mix surface bacteria throughout the meat. By using a meat thermometer, cooks can ensure that the heat penetrates the meat evenly and thoroughly, killing harmful pathogens. Additionally, each degree of temperature can affect the texture and juiciness of the burger; for example, cooking to a lower temperature, such as 140°F (60°C), may yield a rare burger, which, while popular among some diners, poses safety risks if not done with careful attention.
Furthermore, the use of a thermometer helps to prevent the common mistake of relying solely on visual cues or cooking times, which can be misleading. Factors such as grill temperature, patty thickness, and initial meat temperature can all vary significantly, affecting the actual cooking time. A meat thermometer eliminates guesswork, allowing for a consistent and safe grilling experience while catering to personal preferences for doneness, ranging from medium-rare to well-done.
Related Post: