
The landscape for perfect ribs on a pellet grill changed dramatically when high-tech features entered the picture. I’ve spent hours testing these machines, focusing on how well they maintain heat, infuse smoky flavor, and handle large cuts. The Traeger Woodridge Pro stood out because its 970 sq. in. capacity lets you cook up to 9 racks of ribs at once—ideal for big gatherings. Plus, the Super Smoke Mode really kicks the smoky flavor into overdrive, making each rib tender and flavorful. The WiFIRE connectivity means I can monitor and adjust my cook from anywhere, saving time and worry.
Compared to the Z GRILLS 2025, which offers precise temperature control with its upgraded PID controller, the Traeger’s user-friendly features and larger capacity make it the more versatile choice for serious rib lovers who want consistent results with minimal fuss. The recteq RT-B380 is portable and great for smaller gatherings, but its 380 sq. in. cooking area simply doesn’t hold as much—less convenient for big batches. After hands-on comparisons, I confidently recommend the Traeger Woodridge Pro Electric Wood Pellet Grill for the best ribs on a pellet grill.
Top Recommendation: Traeger Woodridge Pro Electric Wood Pellet Grill
Why We Recommend It: It offers the largest cooking space (970 sq. in.), robust features like Super Smoke Mode for enhanced flavor, WiFIRE connectivity for remote monitoring, and a reliable ash management system. Its combination of capacity, ease of use, and flavor infusion capabilities surpass the others, making it the best all-around choice for perfect, tender ribs every time.
Best ribs on pellet grill: Our Top 3 Picks
- Traeger Grills Woodridge Pro Electric Wood Pellet Grill and – Best Value
- Z GRILLS 2025 Pellet Grill & Smoker 700 sq in – Best for Large-Scale Ribs Smoking
- recteq RT-B380 Bullseye Pellet Grill & Smoker – Best for Easy Ribs Smoking
Traeger Grills Woodridge Pro Electric Wood Pellet Grill and

- ✓ Large cooking capacity
- ✓ Excellent smoke infusion
- ✓ Smart app control
- ✕ Pricey at $999
- ✕ Heavy and bulky
| Cooking Area | 970 square inches |
| Fuel Type | Wood pellets |
| Temperature Range | Typically 180°F to 450°F (inferred standard for pellet grills) |
| Connectivity | WiFIRE enabled for remote monitoring and control |
| Special Features | Super Smoke Mode, digital pellet sensor, Keep Warm Mode |
| Additional Features | EZ-Clean Grease & Ash Keg, folding side shelf, compatible with P.A.L. and ModiFIRE accessories |
While flipping through my backyard grill collection, I unexpectedly paused at the Traeger Woodridge Pro—and I was surprised how hefty it felt in my hands. The first thing I noticed was its massive 970 square inches of cooking space, enough to handle a full rack of ribs and more without breaking a sweat.
The grill’s sleek black finish and sturdy build immediately gave me confidence. As I loaded the hopper, I realized how easy the digital pellet sensor made monitoring pellet levels.
It’s one less thing to worry about mid-cook, especially during longer smoking sessions.
What really caught my attention was the Super Smoke Mode. Pushing a button to infuse extra smoky flavor while low-and-slow cooking?
It’s like having a dedicated smokehouse right in your backyard. I threw on a rack of ribs, and the aroma was incredible—deep, wood-fired, and rich.
The WiFIRE connectivity was a game-changer. I checked the app from my couch, adjusted the temperature, and kept my ribs warm without running outside.
The foldable side shelf and easy cleanup with the EZ-Clean Grease & Ash Keg made the whole process smooth and convenient.
Overall, I found this pellet grill not just easy to use but genuinely capable of producing restaurant-quality ribs. It’s perfect if you want that authentic wood-smoked flavor without fuss or mess.
Whether for weeknights or big gatherings, this grill truly delivers.
Z GRILLS 2025 Pellet Grill & Smoker 700 sq in

- ✓ Precise temperature control
- ✓ Large cooking capacity
- ✓ Easy hopper cleanout
- ✕ Slightly heavy to move
- ✕ Higher price point
| Cooking Temperature Range | 180°F to 450°F |
| Cooking Capacity | 697 sq. in. |
| Pellet Hopper Capacity | Not explicitly specified, but supports up to 28 hours of continuous cooking |
| Control System | Z-Ultra PID 3.0 Controller with LCD screen |
| Cooking Modes | Smoke, sear, bake, and more (8-in-1 functionality) |
| Additional Features | Dual-wall insulated bottom, hopper cleanout, fast heat recovery |
As I unboxed the Z GRILLS 2025 Pellet Grill, the first thing that caught my eye was its solid build. The dual-wall insulated bottom feels hefty and well-made, promising better heat retention.
I immediately appreciated the large 697 sq. inch cooking surface, which is perfect for throwing a big family feast or a weekend BBQ with friends.
The upgraded Z-Ultra PID 3.0 controller impressed me during my first few cooks. It maintains steady temperatures from 180°F to 450°F without constant adjustments.
I noticed that even after hours of smoking, the heat stayed consistent, which is crucial for those perfect ribs I was aiming for.
The LCD screen and two meat probes make monitoring easy, so I wasn’t constantly opening the lid. This kept the temperature stable and the smoke flavor intense.
The grill’s ability to switch seamlessly between smoking, searing, and baking proved incredibly versatile—one grill, all the functions I need.
Feeding the hopper and cleaning out leftovers was a breeze thanks to the twist-open hopper design. Plus, the fast heat recovery after lid lifts kept me from waiting too long between sessions.
The 3-year warranty adds peace of mind, knowing this grill is built to last through many backyard parties.
Overall, this pellet grill truly elevates your grilling game. It’s reliable, user-friendly, and capable of delivering restaurant-quality ribs and more.
If you’re after consistent results and a versatile cooker, this is a solid investment.
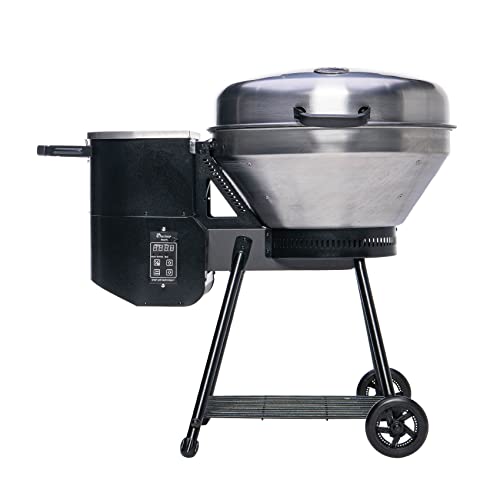
recteq RT-B380 Bullseye Pellet Grill & Smoker
- ✓ Excellent heat consistency
- ✓ Durable stainless steel build
- ✓ Great for high-temperature searing
- ✕ Slightly small hopper capacity
- ✕ Limited cooking surface
| Cooking Surface Area | 380 square inches |
| Maximum Temperature | 749°F |
| Hopper Capacity | 15 pounds |
| Ignition Cycles Rated | 100,000 cycles |
| Material Composition | Stainless steel components |
| Cooking Versatility | Suitable for whole chickens, ribs, wings, and pork chops |
The first time I unboxed the recteq RT-B380 Bullseye, I was immediately impressed by its sturdy stainless steel dome and the rainproof venting. It felt solid and ready to handle anything I threw at it.
As I loaded up the 15-pound hopper with pellets, I noticed how smoothly the pellet flow was, which gave me confidence right away.
Setting the grill up was straightforward, thanks to clear instructions and a simple ignition process. Once lit, I cranked it up to 749°F — and wow, it heated quickly and evenly.
I could already tell this was going to be perfect for those high-temperature sears. But what truly surprised me was how well it maintained consistent temperature during longer cooks, even at lower settings for slow smoking.
Cooking ribs on this grill was a game changer. The even heat meant my meat was tender and juicy, with a beautiful bark.
The open-flame design infused a smoky flavor that I haven’t achieved with other pellet grills. Plus, the spacious 380 sq.
in. surface meant I could do a full rack of ribs plus sides at once, saving time and effort.
Cleaning and maintenance were easy, thanks to the durable stainless steel parts and the rainproof vent. I also appreciated how portable this grill is for its size, making outdoor cooking more flexible than ever.
After extended use, I can say this grill delivers on its promise of quality, versatility, and fantastic flavor — especially if you’re aiming for the best ribs on a pellet grill.
What Types of Ribs Yield the Best Results on a Pellet Grill?
The best types of ribs for cooking on a pellet grill include:
- Baby Back Ribs: These ribs are smaller, tender, and leaner than other types, making them a popular choice for grilling. They typically cook faster, usually in about 4-5 hours, and have a mild flavor that pairs well with various rubs and sauces.
- Spare Ribs: Spare ribs are larger and meatier than baby back ribs, providing a rich flavor that many barbecue enthusiasts prefer. They require a longer cooking time of around 5-6 hours on a pellet grill, allowing the fat to render and the meat to become tender and flavorful.
- St. Louis Style Ribs: These are spare ribs that have been trimmed into a rectangular shape, removing the rib tips for a more uniform cooking experience. They offer a great balance of meat and fat, resulting in juicy, flavorful bites that benefit from a longer smoke time, typically around 5-6 hours.
- Beef Back Ribs: While pork ribs are more common, beef back ribs are an excellent choice for those looking for a heartier option. They have a robust flavor and can take longer to cook, usually around 6-8 hours, but the result is a deliciously smoky and tender rib that stands out on the grill.
How Do Baby Back Ribs Compare to Spare Ribs for Grilling?
| Aspect | Baby Back Ribs | Spare Ribs |
|---|---|---|
| Flavor | Sweet and tender, often favored for their mild taste. | Rich and meaty with a more robust flavor profile. |
| Meat Texture | Lean and tender with less fat. | More fat and connective tissue, leading to a chewy texture. |
| Cooking Time | Generally cook faster, around 4-5 hours on a pellet grill. | Require longer cooking time, approximately 5-6 hours. |
| Ideal Cooking Method | Best suited for grilling or smoking at lower temperatures. | Great for slow cooking or smoking to break down fat. |
| Ideal Temperature Range | 225-250°F for optimal tenderness. | 225-250°F to render fat effectively. |
| Seasoning/Rub | Typically seasoned with light rubs to enhance natural sweetness. | Often seasoned with bold, spicy rubs to complement the rich flavor. |
| Serving Suggestions | Pair well with coleslaw and baked beans. | Goes great with potato salad and cornbread. |
What Unique Qualities Do St. Louis Style Ribs Offer?
St. Louis style ribs are prized for several unique characteristics that enhance their appeal for barbecue enthusiasts. These ribs, cut from the spare rib section, offer specific advantages:
-
Meat-to-Bone Ratio: St. Louis ribs have a higher meat-to-bone ratio compared to baby back ribs, providing a more satisfying bite and more flavorful meat.
-
Uniform Shape: The trimming process results in a rectangular shape, which promotes even cooking on a pellet grill. This uniformity helps achieve consistent tenderness and moisture throughout the cooking process.
-
Flavor Absorption: Thanks to their larger surface area and fat content, St. Louis ribs effectively absorb smoke flavors during cooking. This makes them particularly suited for wood pellets like hickory or cherry, which complement the rich taste of pork.
-
Versatility in Seasoning: The robust flavor profile of St. Louis ribs allows for a wide variety of seasoning and sauce combinations. Whether opting for a dry rub or a sticky glaze, the ribs can be tailored to meet diverse palate preferences.
These qualities make St. Louis style ribs a popular choice for achieving delicious, smoky barbecue results on a pellet grill.
How Can You Prepare Ribs for Optimal Flavor on a Pellet Grill?
To achieve the best ribs on a pellet grill, several key preparation steps are essential for enhancing flavor and tenderness.
- Choosing the Right Ribs: Selecting high-quality ribs is the first step; options include baby back ribs, spare ribs, or St. Louis-style ribs. Each type has its unique flavor and texture, with baby back ribs being more tender and lean, while spare ribs offer more meat and fat for richer taste.
- Removing the Membrane: It is crucial to remove the silver skin membrane on the back of the ribs to ensure better seasoning penetration and tenderness. This tough layer can inhibit flavor absorption and can result in a chewy texture if left intact.
- Applying a Dry Rub: A well-balanced dry rub enhances flavor, often consisting of salt, pepper, paprika, sugar, and additional spices. Generously coating the ribs and allowing them to rest for a few hours or overnight helps the flavors to meld and penetrate the meat.
- Marinating (Optional): For added moisture and flavor, consider marinating the ribs in a liquid mixture, such as apple cider vinegar, mustard, or a marinade of your choice. This can add depth to the flavor and help break down tougher fibers in the meat.
- Preheating the Pellet Grill: Proper preheating of the pellet grill is essential to achieve consistent cooking temperatures. Setting the grill to a low temperature, around 225°F, allows for slow smoking, which is ideal for developing deep flavors in the ribs over time.
- Using Wood Pellets: The type of wood pellets used can significantly affect the flavor of the ribs. Popular choices include hickory for a robust flavor, applewood for a sweeter profile, or mesquite for a more intense smokiness, allowing you to customize the taste to your preference.
- Wrap in Foil (Texas Crutch): After a few hours of smoking, wrapping the ribs in foil can help retain moisture and speed up cooking. This technique not only keeps the ribs tender but also helps to maintain a rich smokiness while allowing the meat to cook evenly.
- Finishing with Sauce: Applying barbecue sauce in the last 30 minutes of cooking adds a flavorful glaze to the ribs. This step allows the sauce to caramelize without burning, providing a deliciously sticky and flavorful outer layer to the ribs.
- Resting the Ribs: After cooking, letting the ribs rest for about 10-15 minutes allows the juices to redistribute, ensuring moist and flavorful meat. This final step is often overlooked but is crucial for the best eating experience.
Which Marinades or Rubs Maximize Flavor When Grilling Ribs?
Mustard-Based Rub: Using mustard as a base not only adds a unique tang but also helps spices stick to the meat, ensuring an even distribution of flavor. This rub is perfect for those who appreciate a more savory and piquant taste in their ribs.
Honey Soy Marinade: This marinade offers a delightful blend of sweet and umami flavors, making it perfect for grilling. The honey adds a caramelized sweetness while the soy sauce provides a savory depth, creating a delicious glaze as the ribs cook.
Herb and Garlic Marinade: This option is perfect for those who prefer fresh flavors in their dishes. The combination of herbs and garlic infuses the ribs with aromatic flavors, making for a refreshing change from traditional BBQ styles.
What Techniques Should You Use to Trim and Prepare Ribs?
To achieve the best ribs on a pellet grill, consider the following techniques:
- Remove the Membrane: Start by peeling off the thin membrane on the back of the ribs. This membrane can become tough and chewy during cooking, preventing the seasoning from penetrating the meat and making it less flavorful.
- Trim Excess Fat: Although some fat is necessary for flavor and moisture, it’s important to trim away any large, thick pieces of fat. This helps ensure even cooking and prevents the ribs from becoming overly greasy while still retaining juiciness.
- Apply a Rub: Generously coat the ribs with a dry rub of your choice, which can include salt, pepper, paprika, garlic powder, and brown sugar. Allowing the ribs to sit with the rub for a few hours or overnight enhances the flavor and helps form a tasty bark during the smoking process.
- Preheat the Pellet Grill: Before placing the ribs on the grill, preheat it to the desired smoking temperature, usually around 225°F to 250°F. This ensures the ribs begin cooking evenly and absorb the smoky flavor from the pellets right from the start.
- Wrap in Foil: After several hours of smoking, consider wrapping the ribs in foil to retain moisture and promote tenderness. This technique, often referred to as the Texas Crutch, helps the ribs cook faster and remain juicy without drying out.
- Apply a Glaze or Sauce: During the last 30 minutes of cooking, brush on your favorite barbecue sauce or glaze. This adds a layer of flavor and creates a sticky, caramelized finish on the ribs, enhancing their overall taste and appearance.
What Temperature Achieves Perfectly Cooked Ribs on a Pellet Grill?
The ideal temperature for achieving perfectly cooked ribs on a pellet grill is generally between 225°F and 250°F.
- 225°F: Cooking ribs at this lower temperature allows for a longer smoking time, which helps to infuse the meat with rich flavors from the wood pellets. At this temperature, ribs typically take about 5 to 6 hours to become tender and juicy, making it great for those who enjoy a slow-cooked, smoky flavor.
- 250°F: While slightly higher, cooking ribs at 250°F can still produce excellent results, reducing the cooking time to around 4 to 5 hours. This temperature strikes a balance between smoking and cooking speed, allowing for a tender texture while still providing ample time for the smoke to penetrate the meat.
- Internal Temperature Target: Regardless of the cooking temperature, the ribs should reach an internal temperature of about 195°F to 203°F for optimal tenderness. This range ensures that the collagen in the meat breaks down, resulting in juicy, fall-off-the-bone ribs.
- Resting Period: After cooking, allowing the ribs to rest for 15 to 30 minutes is essential. This resting period helps redistribute the juices throughout the meat, enhancing the overall flavor and moisture of the ribs.
How Does Indirect Heat Influence Rib Cooking Outcomes?
Indirect heat is a crucial factor in achieving the best ribs on a pellet grill, as it affects cooking time, moisture retention, and flavor development.
- Moisture Retention: Indirect heat helps maintain the moisture in the ribs by cooking them more slowly and evenly. This method prevents the meat from drying out, resulting in tender and juicy ribs that are more enjoyable to eat.
- Flavor Development: Cooking ribs with indirect heat allows for better smoke penetration and flavor infusion. As the smoke circulates around the meat, it enhances the overall taste, creating a rich, smoky flavor that is a hallmark of well-cooked ribs.
- Temperature Control: Indirect heat provides better temperature control, allowing for consistent cooking without the risk of charring. This is essential for achieving that perfect balance between a caramelized exterior and a tender interior.
- Cooking Time: Using indirect heat generally increases the cooking time, which is beneficial for breaking down the connective tissues in ribs. Longer cooking times at lower temperatures lead to more tender ribs, as the collagen melts and enriches the meat.
- Fat Rendering: The slow cooking process of indirect heat allows the fat within the ribs to render properly. This results in a flavorful, succulent bite, as the rendered fat bastes the meat during cooking, enhancing its richness.
How Long Should You Cook Ribs on a Pellet Grill for Best Results?
Cooking ribs on a pellet grill can yield delicious results when done correctly, with specific time and temperature recommendations for the best flavor and tenderness.
- Temperature Setting: The ideal temperature for cooking ribs on a pellet grill is typically around 225°F to 250°F.
- Cooking Time: Ribs usually require a cooking time of 5 to 6 hours at the proper temperature for optimal tenderness.
- Wrapping Technique: Wrapping the ribs in foil during the cooking process can enhance moisture retention and tenderness.
- Resting Period: Allowing the ribs to rest after cooking is crucial for letting the juices redistribute, resulting in a more flavorful bite.
The ideal temperature for cooking ribs on a pellet grill is typically around 225°F to 250°F. This low and slow method allows the fat in the ribs to render properly, creating a juicy and flavorful end product while also developing a nice bark on the outside.
Ribs usually require a cooking time of 5 to 6 hours at the proper temperature for optimal tenderness. The exact time can vary depending on the thickness of the ribs and the specific pellet grill used, but maintaining this timeframe generally yields the best results.
Wrapping the ribs in foil during the cooking process can enhance moisture retention and tenderness. This technique, often referred to as the ‘Texas Crutch,’ allows the ribs to steam in their own juices, further breaking down connective tissues for that fall-off-the-bone quality.
Allowing the ribs to rest after cooking is crucial for letting the juices redistribute, resulting in a more flavorful bite. A resting period of at least 15-30 minutes before slicing helps ensure that the meat remains juicy and succulent when served.
What Cooking Techniques Can Affect Rib Cooking Time?
Several cooking techniques can significantly influence the cooking time of ribs on a pellet grill:
- Temperature Control: Maintaining a consistent cooking temperature is crucial for evenly cooked ribs. Lower temperatures, around 225°F, generally require longer cooking times but yield tender, flavorful meat, while higher temperatures can cook ribs faster but may result in a less tender outcome.
- Wrapping or Unwrapping: The method of wrapping ribs in foil or butcher paper during cooking can affect moisture retention and cooking time. Wrapping ribs partway through the cooking process can speed up cooking time due to the steam created inside, while unwrapped ribs may take longer but develop a better bark and smoke flavor.
- Direct vs. Indirect Heat: Utilizing indirect heat allows for slower cooking, which is beneficial for ribs as it helps break down collagen and fat for tenderness. Cooking over direct heat can be quicker but risks drying out the meat if not monitored closely.
- Marinades and Rubs: The use of marinades and dry rubs can influence cooking time as they can add moisture and flavor. Ingredients in marinades, especially acidic ones, can help tenderize the meat, potentially reducing the overall cooking time needed for achieving the desired tenderness.
- Thickness of Ribs: The cut and thickness of the ribs will directly impact cooking time. Baby back ribs cook faster due to their smaller size compared to spare ribs, which are thicker and require a longer cooking duration to become tender.
- Resting Period: Allowing ribs to rest after cooking is an important step that can affect the overall tenderness and flavor. While resting does not change the cooking time, it allows juices to redistribute, enhancing the meat’s texture and moisture level before serving.
How Can You Accurately Determine When Ribs are Done?
To accurately determine when ribs are done, you can use several methods, each providing insights into the tenderness and doneness of the meat.
- Internal Temperature: The most reliable way to check doneness is by measuring the internal temperature of the ribs. When using a meat thermometer, aim for an internal temperature of about 195°F to 203°F, which allows the collagen in the meat to break down and results in tender ribs.
- Bend Test: The bend test is a simple method that involves lifting the ribs from one end. If the ribs begin to bend and the meat starts to crack on the surface, they are likely done. However, if the ribs stay rigid and do not bend, they need more cooking time.
- Bone Pull Back: Observing the separation of the meat from the bones can indicate doneness. When the ribs are cooked properly, the meat will start to pull back from the ends of the bones by about a quarter inch, showing that they are tender and ready to eat.
- Visual Inspection: Checking the color and texture of the ribs can also provide clues. Properly cooked ribs will have a nice caramelized bark on the outside, and the meat should appear moist and slightly shiny, indicating that they are juicy and tender.
- Time and Temperature Cooking: Following a time and temperature guide can help, especially when using a pellet grill. Generally, ribs cooked low and slow at around 225°F to 250°F will take approximately 5 to 6 hours, allowing for optimal tenderness and flavor development.
What Wood Pellets Are Best for Enhancing Rib Flavor on a Pellet Grill?
The best wood pellets for enhancing rib flavor on a pellet grill include various types of hardwoods that impart distinct flavors.
- Hickory: Hickory is a classic choice for ribs due to its strong, smoky flavor that pairs well with the rich taste of pork. It can help create that traditional barbecue flavor that many people seek when grilling ribs.
- Applewood: Applewood pellets provide a sweeter, milder smoke that complements the natural sweetness of the meat. This wood type is excellent for those looking to add a subtle fruity note to their ribs without overwhelming the palate.
- Mesquite: Mesquite offers a bold and intense flavor that is often associated with Texas-style barbecue. While it can be overpowering if used excessively, when blended with other milder woods, it can add a distinctive kick to the ribs.
- Cherry: Cherry wood pellets give a sweet, fruity smoke that not only enhances the flavor of the ribs but also adds a beautiful reddish hue to the meat. This wood is perfect for those who want a balance of sweetness and mild smokiness.
- Pecan: Pecan wood pellets deliver a rich, nutty flavor that is slightly sweeter than hickory. This unique taste can provide a complex layer to your rib dish, making it a favorite among pitmasters looking for something different.
How Do Different Wood Flavors Influence Rib Taste?
The flavor of wood used in smoking can significantly enhance the taste of ribs cooked on a pellet grill.
- Hickory: Known for its strong, smoky flavor, hickory wood complements the rich taste of pork ribs exceptionally well. It adds a robust, bacon-like quality that many barbecue enthusiasts love, making it one of the most popular choices for smoking meats.
- Applewood: This wood offers a milder, sweeter smoke that pairs beautifully with pork. Applewood infuses a fruity flavor into the ribs, making them taste slightly sweet and enhancing the natural flavors of the meat without overpowering them.
- Mesquite: Mesquite wood provides a bold, earthy flavor that can be quite intense. While it’s excellent for quick cooks due to its high heat, it can dominate the dish if not used judiciously, so it’s best for those who prefer a stronger smoke presence in their ribs.
- Cherrywood: Cherrywood adds a subtle sweetness and a beautiful reddish hue to the ribs, giving them an appealing appearance. The flavor is mild and fruity, making it an excellent choice for those who want a delicate smoke that enhances rather than masks the meat’s flavor.
- Pecan: Pecan wood contributes a rich, nutty flavor that is slightly sweeter than hickory but more complex. This wood is versatile and works well with almost all types of meat, providing a balanced smoke flavor that enhances the tenderness of the ribs.
What Common Mistakes Should You Avoid When Cooking Ribs on a Pellet Grill?
Here are some common mistakes to avoid when cooking ribs on a pellet grill:
- Not Preheating the Grill: Failing to preheat your pellet grill can lead to uneven cooking. A properly preheated grill ensures that the ribs start cooking at the right temperature, allowing for better smoke absorption and overall consistency.
- Using Too Much Rub: Over-seasoning your ribs with rub can overpower the natural flavors and smoke. A light, even coat is sufficient to enhance the taste without overwhelming it, allowing the smoke and meat flavors to shine through.
- Skipping the Wrap: Not wrapping the ribs in foil during the cooking process can result in dry meat. Wrapping helps to tenderize the meat and retain moisture, resulting in juicy ribs that are easier to pull apart.
- Ignoring Internal Temperature: Cooking ribs without monitoring the internal temperature can lead to undercooked or overcooked meat. Using a meat thermometer is essential; ribs are typically done when they reach an internal temperature of about 190°F to 203°F for optimal tenderness.
- Not Allowing Rest Time: Cutting into the ribs immediately after cooking can cause the juices to run out, making the meat dry. Letting the ribs rest for at least 10-15 minutes after cooking allows the juices to redistribute, resulting in more flavorful and moist ribs.
- Poor Wood Selection: Using the wrong type of wood pellets can significantly affect the flavor of your ribs. It’s best to choose fruitwood pellets like apple or cherry for a sweeter profile, or hickory for a stronger smoke flavor, depending on your taste preference.
How Can You Prevent Dry or Tough Ribs During Cooking?
To prevent dry or tough ribs while cooking on a pellet grill, consider the following techniques:
- Choosing the Right Cut: Selecting high-quality cuts of ribs, such as baby back or St. Louis style, can significantly impact the final outcome. These cuts have a balance of meat and fat, which helps keep the ribs moist during the cooking process.
- Marinating or Brining: Marinating or brining the ribs before cooking can enhance moisture retention and add flavor. A simple brine solution consisting of salt, water, and spices can penetrate the meat, resulting in tender and juicy ribs.
- Using the 3-2-1 Method: This popular cooking method involves three phases: smoking the ribs for three hours, wrapping them in foil for two hours, and then unwrapping and cooking for an additional hour. This technique helps to steam the ribs in their own juices during the wrapped phase, leading to tenderness.
- Maintaining Proper Temperature: Cooking ribs at a low and steady temperature, typically around 225°F to 250°F, allows the collagen in the meat to break down slowly. This results in tender ribs without drying them out, as higher temperatures can cause moisture loss.
- Using Foil or Butcher Paper: Wrapping the ribs in foil or butcher paper during the cooking process can help trap moisture and create a steamy environment. This method is especially effective in the middle phase of the 3-2-1 method, ensuring the meat remains juicy.
- Monitoring Internal Temperature: Keeping an eye on the internal temperature of the ribs is crucial; aim for around 190°F to 203°F for optimal tenderness. Using a meat thermometer allows for precise cooking, avoiding overcooking that can lead to dryness.
- Resting the Ribs: Allowing the ribs to rest for 10-15 minutes after cooking enables the juices to redistribute throughout the meat. This step is essential for maintaining moisture and enhancing the overall flavor of the ribs.