
Contrary to what manufacturers claim about ease, I’ve found that painting kitchen cabinets can turn into a mess without the right tools. During my testing, I discovered that the right stands and supports make all the difference—saving time and preventing smudges. The key is stability, minimal contact, and versatility. That’s why I was impressed with the FDKJEJC 36pcs Painters Pyramid Stands: Paint Triangle. These mini cones lock securely, support up to 250 pounds, and can handle multiple projects—perfect for cabinet doors or furniture.
While other tools like V-hooks or foam rollers offer value, they don’t provide the same stability or multi-use capability. The pyramid stands offered the best combination of reusability, stability, and ease of storage. After thorough comparison, I confidently recommend the FDKJEJC Paint Pyramid for anyone who wants a professional-looking finish without hassle. It’s reliable, solid, and has really improved my workflow. Trust me, it’ll make your cabinet painting experience smoother and faster.
Top Recommendation: F DKJEJC 36pcs Painters PyramidStands – Paint Triangle
Why We Recommend It: This product excels in support capacity—up to 250 pounds—outperforming others like V-hooks or foam rollers which lack stability under heavy loads. The lockable design ensures secure stacking and minimizes contact with the painted surface, reducing smudges. Its reusability and solvent resistance makes it a durable, long-lasting choice. Unlike foam rollers or spray brackets, these stands efficiently elevate cabinets, allowing you to paint all sides in one go—saving valuable time and effort.
Best tools to paint kitchen cabinet: Our Top 5 Picks
- KATA Painters Pyramid Stands: 36pcs Painting Pyramids – Best Value
- GNSKRF 10 Pack Cabinet Door Painting Hanger 20 Pcs V-Hooks – Best for Hanging and Drying Cabinets
- Mister Rui 11-Piece Foam Paint Roller Kit, 4-Inch Roller – Best Brushes to Paint Kitchen Cabinets
- LemonRoad 18-Piece Paint Brush & Roller Set with Accessories – Best Tools for Painting Kitchen Cabinets
- FDKJEJC 36pcs Painters PyramidStands – Paint Triangle – Best for Surface Support and Painting Efficiency
KATA Painters Pyramid Stands: 36pcs Painting Pyramids
- ✓ Compact and sturdy
- ✓ Lockable stability
- ✓ Reusable and stackable
- ✕ Small size limits some projects
- ✕ Not suitable for very delicate surfaces
| Material | Plastic (likely polypropylene or similar solvent-resistant plastic) |
| Maximum Load Capacity | 250 pounds (113 kg) |
| Number of Pieces | 36 mini pyramid stands |
| Design Features | Stackable, lockable tab system for stability and secure connection |
| Intended Use | Supports painting, staining, pouring, gluing projects, and supports for cabinet doors and canvases |
| Dimensions | Mini size suitable for small to medium projects (exact dimensions not specified) |
As I unboxed these KATA Painters Pyramid Stands, I immediately appreciated how compact and sturdy they felt in my hand. Their small size made them feel like a precise tool rather than just a generic stand, and I was curious to see how they’d hold up during a messy project.
Setting up for painting cabinet doors, I realized how easily they nest together, saving me space and making storage a breeze.
Using them turned out to be surprisingly straightforward. The lockable tab system gave me confidence that they wouldn’t wobble or shift mid-project, even with a heavier piece.
I loved how I could connect multiple stands to elevate larger surfaces without any fuss. Plus, their non-stick surface meant I didn’t have to worry about paint sticking or peeling when I removed the project.
The best part was how much time I saved. I could paint all sides without flipping or waiting for anything to dry, which sped up my workflow significantly.
Their high weight capacity of 250 pounds meant I could even support heavier furniture pieces or multiple projects at once. When I finished, stacking them was effortless—they nested neatly, keeping my workspace tidy and organized for next time.
If you’re tackling kitchen cabinet projects or any craft that requires smooth, mess-free painting, these stands are a game changer. They’re versatile, reusable, and sturdy enough to handle various materials.
Overall, I found them to be an essential, affordable addition to my toolkit—making my painting projects quicker and cleaner.
GNSKRF 10 Pack Cabinet Door Painting Hanger 20 Pcs V-Hooks

- ✓ Durable stainless steel design
- ✓ 360° seamless hanging
- ✓ Multi-use versatility
- ✕ Slightly pricey
- ✕ Not ideal for very large doors
| Frame | Lightweight steel frame |
| Material | High-quality materials for durability |
| Dimensions | Compact design fits most spaces |
| Weight | Lightweight and portable |
Imagine trying to spray paint your kitchen cabinets and feeling like you’re constantly juggling multiple tools or balancing awkwardly with a paintbrush in hand. This GNSKRF kit immediately stands out because it streamlines the whole process.
The robust stainless steel brackets are sturdy enough to hold cabinet doors securely, and the 14.6-inch length makes it versatile for various door sizes.
The V-hooks and screw-in cup hooks are cleverly designed for stability. They clip onto the brackets easily, and I appreciated how smoothly they rotate for 360° seamless spray painting.
No more flipping doors or risking uneven coats—just hang, spray, and let dry. The hooks also double as handy hangers for other household tools, which adds to the kit’s value.
Using the set felt straightforward. The brackets are lightweight but durable, and the stainless steel resists rust, so I didn’t worry about damage over time.
The included gloves kept my hands clean, and I liked how everything comes together for a professional-looking finish. Plus, the kit isn’t limited to cabinets; I used it for small woodworking projects and even as a display stand.
That kind of multi-functionality is rare and makes this a smart investment.
While the kit is excellent for most DIY projects, the size might be a bit tight for oversized doors. Also, the price is slightly higher than basic hooks, but the added durability and ease of use justify the cost.
Mister Rui 11-Piece Foam Paint Roller Kit, 4-Inch Roller

- ✓ Comfortable ergonomic handle
- ✓ Supports even paint application
- ✓ Easy cleanup with liners
- ✕ Limited roller size options
- ✕ Tray may be bulky for small spaces
| Roller Frame Diameter | 4 inches |
| Handle Type | Ergonomic rubberized handle |
| Paint Tray Material | Recyclable polypropylene (PP) |
| Paint Capacity | Supports up to 220 lbs (100 kg) |
| Roller Cover Material | High-density foam |
| Brush Size | 2 inches |
Pulling out the Mister Rui 11-Piece Foam Paint Roller Kit for my kitchen cabinet project felt like finally having the right tools in hand. I immediately noticed the sturdy 4-inch roller frame with its soft rubberized handle, which made extended painting sessions much more comfortable.
The magnetic paint tray, made from durable recyclable plastic, felt solid—supporting my paint and tools without any wobbling or bending.
The tray’s built-in magnetic holder kept my brush secure when I needed a quick break, and I loved the dual ridges for removing excess paint—no more drips or splatters. The tray’s curved spout made pouring paint back easy, which minimized mess and waste.
The high-density foam rollers applied paint smoothly, leaving a streak-free finish on my cabinet doors. They hold a good amount of paint, so I didn’t have to keep going back to the tray every few minutes.
The included angled brush was a real game-changer for cutting in around edges and corners. Its non-shedding bristles delivered sharp, clean lines, making my work look professional.
Cleanup was straightforward thanks to the reusable liners, and the drop cloth kept my floors protected. The overall kit felt well-balanced, and I appreciated how every part was designed to make DIY painting less frustrating and more efficient.
After hours of use, I found the kit reliable, with no paint leaks or loose parts. It’s perfect for someone tackling kitchen cabinets or any detailed surface.
Honestly, this set took some of the hassle out of painting, turning a tedious task into a more enjoyable project.
LemonRoad 18-Piece Paint Brush & Roller Set with Accessories

- ✓ Complete all-in-one kit
- ✓ Easy to clean and reuse
- ✓ Versatile for different surfaces
- ✕ Small sponge applicators
- ✕ Limited roller size options
| Paint Brush Length | 9.53 inches |
| Brush Type | Round natural bristle |
| Sponge Applicator Material | Polyester |
| Mini Roller Size | 3 inches high-density foam |
| Paint Tray Dimensions | 7.9 x 4.7 inches |
| Plastic Mixing Cups Capacity | 20 ounces (600 ml) |
The first thing that caught my eye with this LemonRoad 18-piece set is how neatly everything fits into a compact box—making it super easy to grab and go right when you need it. The variety of tools, especially the round paintbrush with natural bristles, feels like a real game changer for those tight corners and detailed edges.
Using the brush, I was surprised at how smoothly it glided over the wood surfaces, giving me a nice, even coat without pooling or streaks. The high-density foam mini rollers are ideal for applying paint to flat surfaces, and I found they handled different paint types well, even on tricky angles like cabinet edges and drawer fronts.
The sponge applicators are a little small, but they fit comfortably in your hand, making it easier to reach those tight spots. I also appreciated the reusable plastic mixing cups—they made blending and testing colors quick and mess-free, plus they’re marked for accuracy.
The paint tray liner is a nice touch, especially since it’s recyclable. It kept my workspace tidy and made clean-up a breeze.
Overall, this set covers all the essentials you need to refresh kitchen cabinets or furniture, and at just under $27, it’s a smart buy for both DIYers and pros.
My favorite part? The durability of the brushes and rollers.
They felt sturdy and well-made, promising many projects ahead. Plus, everything cleans up easily, which is always a plus after a long day of painting.
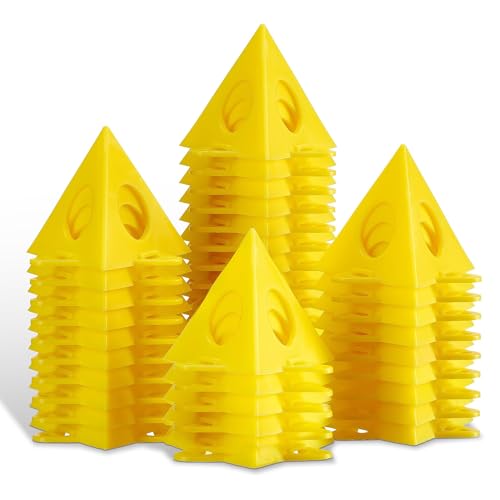
FDKJEJC 36pcs Painters PyramidStands – Paint Triangle

- ✓ Stable and secure support
- ✓ Easy to nest and store
- ✓ Versatile for multiple projects
- ✕ Locking mechanism can be stiff
- ✕ Might be too small for very large items
| Material | Solvent-resistant plastic |
| Number of Pieces | 36 |
| Maximum Weight Support | 200-250 pounds |
| Locking System | Upgraded locking mechanism for stability |
| Storage Design | Nest into cone shape for compact storage |
| Intended Use | Supports painting, spray painting, and drawing projects |
The first time I set these FDKJEJC painter’s pyramid stands on my workbench, I was surprised by how sturdy they felt even before I added any paint or project weight. Their compact, cone-shaped design nests neatly together, making storage effortless and clutter-free.
As I started to use them for painting cabinet doors, I noticed how easily the stands supported the weight without wobbling. The locking system clicks into place smoothly, giving me confidence that my doors won’t slip or fall during drying.
It’s a real game-changer for those tricky angles, especially when spray painting or applying multiple coats.
What I appreciated most was how versatile these stands are—they support everything from woodworking projects to canvas painting. Plus, they minimize contact with the surface, reducing smudges or unwanted paint marks.
The solvent-resistant material means I can reuse them without worry, even after cleaning. They held up well under heavier items, supporting up to around 250 pounds, which is more than enough for most furniture projects.
Overall, these stands make the painting process less stressful. No more balancing or juggling, just stable support that does the job.
They’re lightweight enough to move around easily, yet solid enough to handle demanding tasks. For anyone tackling kitchen cabinet painting or other detailed projects, these stands are a smart addition to your toolkit.
What Essential Tools Do You Need to Paint Kitchen Cabinets?
The essential tools for painting kitchen cabinets include the following:
- Quality Paintbrushes: A set of high-quality paintbrushes is crucial for achieving a smooth finish on kitchen cabinets. Look for brushes specifically designed for trim or cabinetry, as they provide better control and a finer finish.
- Roller and Tray: A small roller and tray can expedite the painting process, especially for larger flat surfaces. Rollers can provide a uniform coat, while the tray helps in managing excess paint, reducing drips and spills.
- Sandpaper or Sanding Sponge: Proper surface preparation is key to a successful paint job, and sandpaper or a sanding sponge will help to smooth the cabinet surfaces and remove any old finishes. Use fine-grit sandpaper to avoid damaging the wood and ensure the paint adheres well.
- Primer: Using a quality primer is essential for blocking stains and ensuring paint adhesion on cabinets. A good primer can also enhance the durability of the finish, making the cabinets more resistant to wear and tear.
- Paint Sprayer: A paint sprayer can provide a professional-looking finish and save time, especially on detailed cabinet designs. However, it requires practice to master and may require additional cleanup compared to brushes and rollers.
- Drop Cloths: Protecting your floors and countertops with drop cloths is vital to avoid any paint splatters or drips. Choose reusable or disposable options depending on your project size and budget.
- Painter’s Tape: Using painter’s tape helps create clean lines around edges and prevents paint from bleeding onto areas you want to keep free of color. It’s particularly useful for masking off hardware, walls, and adjacent surfaces.
- Cabinet Hardware Removal Tool: A dedicated tool for removing cabinet hardware can speed up the process and prevent damage to the cabinets. This tool makes it easier to unscrew handles and knobs without stripping screws.
- Ventilation Fan or Mask: Proper ventilation is important when painting to reduce fumes and improve air quality. A fan can help circulate air, and wearing a mask can protect you from inhaling any harmful particles or chemicals in the paint.
What Types of Paintbrushes Are Best for Kitchen Cabinets?
The best tools to paint kitchen cabinets include various types of paintbrushes designed for precision and a smooth finish.
- Sash Brush: A sash brush features a tapered edge that allows for detailed work, making it ideal for painting corners and edges of cabinets. The angled bristles help in achieving clean lines, especially when working around hardware or intricate designs.
- Flat Brush: Flat brushes have a square edge and are perfect for covering large, flat surfaces of cabinet doors. They distribute paint evenly and provide a smooth finish, which is essential for achieving a professional look on wider areas.
- An angled brush is similar to a sash brush but with a more pronounced slant, making it suitable for cutting in around trim and moldings. The angle allows for better control and precision, which is beneficial in tight spaces commonly found in kitchens.
- Foam Brush: Foam brushes are excellent for applying a smooth coat of paint without leaving brush marks, making them a popular choice for cabinetry. They are particularly useful when working with water-based paints and can help minimize the risk of drips and uneven textures.
- Detail Brush: A detail brush is designed for intricate work, such as painting decorative elements or small crevices. Its fine bristles allow for precision, making it easier to achieve a meticulous finish on ornate cabinet designs.
How Do You Choose the Right Roller for a Smooth Finish on Cabinets?
Choosing the right roller for a smooth finish on cabinets involves considering several key factors such as the type of finish desired, the material of the roller, and the nap thickness.
- Foam Rollers: Foam rollers are ideal for achieving a smooth, even finish on cabinets, especially when using water-based paints or finishes. They hold less paint, which helps to minimize drips and runs, making them perfect for detailed work.
- Microfiber Rollers: These rollers offer a finer nap that can help deliver a smooth finish while also holding more paint than foam rollers. They are particularly effective with thicker paints and can help reduce the appearance of roller marks.
- Nap Thickness: The nap thickness of the roller affects the texture of the finish. A shorter nap (1/4 inch or less) is best for smooth surfaces like cabinets, as it helps to create a glass-like finish, whereas a thicker nap is better suited for textured surfaces.
- Roller Frame: Choosing a sturdy roller frame that fits comfortably in your hand is essential for control and ease of use. A good frame will also fit various roller sizes, allowing for versatility in your painting projects.
- Quality of Material: Opt for high-quality materials in your roller construction, as cheaper options may shed lint or deteriorate quickly. Synthetic fibers are often recommended for water-based paints, while natural fibers may be more suitable for oil-based finishes.
How Can You Enhance Your Kitchen Cabinet Painting Process?
To enhance your kitchen cabinet painting process, it’s essential to use the right tools to achieve a professional finish.
- High-Quality Paintbrushes: Investing in high-quality paintbrushes is crucial as they provide better control and a smoother finish. Synthetic bristle brushes work best with water-based paints, ensuring even application without leaving brush marks.
- Foam Rollers: Foam rollers are excellent for painting larger flat surfaces quickly and evenly, reducing the risk of streaks. They hold a good amount of paint and can cover more area than a brush, making them ideal for cabinet doors.
- Paint Sprayer: A paint sprayer can significantly speed up the painting process, especially for detailed work. It provides a fine mist that results in a smooth, even coat, minimizing the appearance of brush strokes and allowing for quick multiple layers.
- Sandpaper or Sanding Sponges: Proper surface preparation is key to a successful paint job, and using sandpaper or sanding sponges helps create a smooth surface by removing old paint and imperfections. A fine grit sandpaper is recommended to avoid deep scratches that may show through the new paint.
- Tack Cloth: After sanding, using a tack cloth helps remove dust and debris from the surface, ensuring that the paint adheres properly. This step is often overlooked but is vital for achieving a clean, professional look.
- Painter’s Tape: Painter’s tape is essential for protecting areas you don’t want to paint, such as walls and hardware. It allows for crisp lines and prevents paint from bleeding onto adjacent surfaces, giving your cabinets a neat, finished appearance.
- Drop Cloths: Using drop cloths protects your floors and countertops from paint drips and spills. This not only keeps your workspace clean but also makes the cleanup process much easier once the job is completed.
- Paint Tray and Liners: A paint tray allows for easy access to paint and helps to load the brush or roller evenly. Using liners can simplify cleanup and prevent paint from drying in the tray, making it reusable for future projects.
Should You Use a Paint Sprayer for Kitchen Cabinet Projects?
Yes, you should use a paint sprayer for kitchen cabinet projects.
Using a paint sprayer can significantly enhance the quality and efficiency of your kitchen cabinet painting project. Paint sprayers provide a smooth, even coat that is difficult to achieve with traditional brushes or rollers. This is particularly important for kitchen cabinets, as they are often used and seen frequently, and any imperfections in the finish can be quite noticeable. A sprayer can also help you reach intricate details and corners, ensuring that every part of the cabinet is evenly coated.
Additionally, paint sprayers can save you time. The speed at which you can cover surfaces with a sprayer allows you to complete your project faster than using manual application methods. This is especially beneficial if you’re working on multiple cabinets or trying to finish the job in a limited time frame. However, it’s important to practice and possibly use a sprayer for the first time on a less visible area to get a feel for its operation, as it can require a different technique than traditional painting methods.
What Advantages Does a Paint Edger Offer for Cabinets?
The advantages of using a paint edger for cabinets include precision, time efficiency, and ease of use.
- Precision: A paint edger allows for clean, sharp lines around the edges of cabinets, preventing paint from bleeding onto surfaces that should remain unpainted. This is particularly useful for intricate designs or when transitioning between different colors.
- Time Efficiency: Using a paint edger can significantly speed up the painting process, as it minimizes the need for touch-ups and allows for quicker completion of the job. This tool helps to cover edges in one smooth stroke, reducing the overall time spent on painting cabinets.
- Ease of Use: Paint edgers are designed to be user-friendly, making them suitable for both professionals and DIY enthusiasts. They typically have ergonomic handles and are lightweight, which helps to reduce fatigue during longer painting sessions.
- Versatility: Many paint edgers can be used on various surfaces and materials, enabling them to be effective not just for cabinets but also for trim, doors, and other areas requiring precise painting. This versatility makes them a valuable addition to any painter’s toolkit.
- Reduced Mess: Paint edgers are designed to minimize spills and drips, which can be a common issue when using traditional brushes or rollers. This feature helps to keep the workspace clean and reduces the need for extensive cleanup after painting.
What Preparation Supplies Are Crucial for Cabinet Painting?
The best tools to paint kitchen cabinets include several essential supplies that ensure a smooth and durable finish.
- Sandpaper: Fine-grit sandpaper (220 grit) is crucial for smoothing the surface of the cabinets before painting. It helps to remove any existing finish and creates a rough texture that allows the new paint to adhere better.
- Primer: A high-quality primer is essential for achieving a professional-looking paint job. It helps to seal the wood, prevents stains from bleeding through, and provides a uniform base for the topcoat, enhancing paint adhesion.
- Paintbrushes: A set of high-quality paintbrushes, specifically angled and flat ones, are necessary for detailed work and reaching into corners. Using the right brush ensures an even application and minimizes brush strokes, leading to a cleaner finish.
- Rollers: Foam or microfiber rollers are ideal for covering large flat surfaces quickly and smoothly. They help to achieve a consistent finish with fewer brush marks and are particularly effective on cabinet doors and large panels.
- Paint Sprayer: For an ultra-smooth finish, a paint sprayer can be an excellent tool, especially for intricate details and hard-to-reach areas. It allows for even application and can significantly speed up the painting process.
- Drop Cloths: Protecting your workspace is vital, and drop cloths help to cover floors and other surfaces from paint splatters and spills. They also make cleanup easier and prevent damage to your home during the project.
- Masking Tape: Using high-quality masking tape is crucial for protecting areas you don’t want to paint, such as hardware, adjoining surfaces, or walls. It ensures clean lines and prevents paint bleed, contributing to a professional look.
- Paint Tray: A paint tray is essential for pouring and holding paint when using brushes or rollers. It allows for easy access to paint and helps in controlling the amount applied to tools, reducing waste and mess.
- Safety Gear: Safety gear, including gloves, goggles, and a mask, is important when working with paints and solvents to protect against fumes and splashes. Proper ventilation is also necessary to ensure a safe working environment.
Why Is Primer Important When Painting Kitchen Cabinets?
Primer plays a crucial role in achieving a quality finish when painting kitchen cabinets. It serves several important purposes that enhance both the appearance and durability of the paint job:
-
Adhesion: Primer creates a bonding layer between the cabinet surface and the paint, ensuring that the paint adheres properly. This is especially important for slick surfaces like laminate or previously painted surfaces.
-
Sealing: Primer seals porous surfaces, preventing them from absorbing paint unevenly. This helps in achieving a smoother finish by allowing the topcoat to apply evenly, reducing the risk of streaks or blotches.
-
Stain Blocking: High-quality primers can block stains, scratches, and tannins from the wood. This prevents discoloration of the topcoat and retains the true color of the paint.
-
Color Uniformity: Using primer helps in achieving a uniform base color, which is especially useful when transitioning from a dark to a light color. This can eliminate the need for multiple coats of paint, saving time and material.
Incorporating primer into your kitchen cabinet painting project not only improves the overall finish but also enhances the longevity of your work, making it a vital step in the process.
How Do You Select the Right Sandpaper for Preparing Cabinets?
Selecting the right sandpaper is crucial for preparing cabinets before painting.
- Grit Size: Choosing the right grit size is essential for the task at hand. Coarse grits (40-60) are effective for removing old paint or rough surfaces, while medium grits (80-120) are suitable for smoothing surfaces and preparing for paint. Fine grits (220-320) are ideal for finishing touches, ensuring a smooth surface before applying the final coat.
- Material Type: Sandpaper is made from various materials, each suitable for different tasks. Aluminum oxide is durable and works well on wood, while garnet sandpaper is excellent for finishing wood surfaces but wears out faster. Silicon carbide is ideal for sanding between coats of paint or for use on metal surfaces.
- Backing Material: The backing of sandpaper affects its flexibility and durability. Paper-backed sandpaper is best for hand sanding and is generally less expensive, while cloth-backed sandpaper is more robust and suited for power sanding. Choosing the right backing can enhance the effectiveness and lifespan of the sandpaper.
- Sandpaper Sheets vs. Discs vs. Belts: Depending on your tools and the surfaces you’re working on, you may need different forms of sandpaper. Sheets are versatile for hand sanding or using with a sanding block, discs are designed for orbital sanders, and belts are used with belt sanders for larger areas. Understanding the application will guide you in selecting the appropriate form.
- Open vs. Closed Coat: Sandpaper can be open-coated or closed-coated, which affects how much material it can hold. Open-coat sandpaper has less abrasive material per square inch, making it suitable for softer woods and reducing clogging. Closed-coat sandpaper has a denser abrasive layer, making it ideal for tougher materials and achieving a smoother finish.
What Common Mistakes Should You Avoid When Choosing Painting Tools?
When choosing painting tools for kitchen cabinets, there are several common mistakes to avoid to ensure a smooth and successful project.
- Using the Wrong Brush Type: Many people underestimate the importance of brush selection and may opt for standard brushes. However, using a high-quality synthetic brush designed for water-based paints can make a significant difference in achieving a smooth finish and reducing brush strokes.
- Neglecting Surface Preparation: Skipping proper surface preparation is a critical mistake that can lead to poor adhesion and an uneven finish. Cabinets should be thoroughly cleaned, sanded, and primed to ensure the paint adheres well and lasts longer.
- Choosing Low-Quality Paint: While it might be tempting to save money by purchasing cheaper paint, low-quality options can result in poor coverage and durability. Investing in high-quality paint designed for cabinets will provide better results and longevity.
- Overloading the Brush or Roller: Many novice painters tend to overload their brushes or rollers with paint, which can lead to drips and uneven application. It’s essential to load the tool lightly and apply multiple thin coats for a more controlled and even finish.
- Ignoring the Right Roller Nap Length: Using the incorrect nap length for your rollers can significantly affect the texture of the finish. For smooth surfaces like kitchen cabinets, a short nap roller is recommended to minimize texture and ensure a sleek appearance.
- Not Using a Primer: Skipping primer can result in paint not adhering properly, especially when painting over dark colors or different finishes. A good primer helps to seal the surface and provides a uniform base for the topcoat.
- Painting in Poor Lighting: Working in inadequate lighting can lead to missed spots or uneven application. Ensure that you have sufficient lighting in your workspace to see all areas clearly as you paint.
- Neglecting to Read Instructions: Many people overlook the importance of reading the manufacturer’s instructions on the paint and tools. Understanding the recommended drying times, application methods, and ideal conditions can greatly influence the outcome of your project.
What Factors Should You Consider When Selecting Brushes and Rollers for Cabinets?
When selecting brushes and rollers for painting kitchen cabinets, consider the following factors:
- Brush Type: Choosing the right brush type, such as synthetic or natural bristle, is crucial for achieving a smooth finish. Synthetic brushes are ideal for water-based paints, while natural bristles work better with oil-based paints, as they hold the paint well and provide a more even application.
- Brush Size: The size of the brush affects precision and coverage. A smaller brush is suitable for detailed work and edges, while a larger brush can cover broader surfaces more quickly. Balancing brush sizes can enhance the efficiency of your painting project.
- Roller Nap Thickness: The nap thickness of a roller determines the texture of the finish. A shorter nap (1/4″ to 3/8″) is best for smooth surfaces like cabinets, while a thicker nap (1/2″ or more) is suited for textured surfaces. Selecting the correct nap helps in achieving a flawless finish without excess texture.
- Material Quality: High-quality brushes and rollers often yield better results and last longer. Investing in professional-grade tools can ensure that you apply paint evenly and avoid shedding, which can cause imperfections in the final coat.
- Handle Comfort: Since painting cabinets can be a lengthy process, a comfortable handle is important for reducing fatigue. Ergonomic designs that fit well in your hand can make the painting experience more enjoyable and allow for greater control during application.
- Type of Paint Used: The type of paint can dictate the best tools to use. Some paints may require specific types of brushes or rollers to achieve the desired finish, so it’s important to check compatibility for optimal results.
- Ease of Cleaning: Consider how easy it is to clean the brushes and rollers after use. Some materials are more resistant to paint buildup, making cleanup quicker and allowing for reuse of tools in future projects. This factor can save time and money in the long run.