
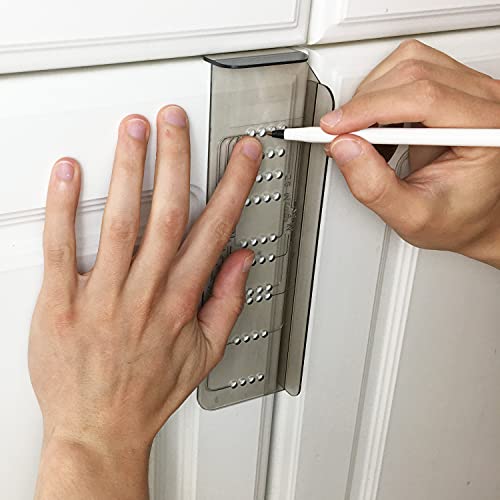
The constant frustration of aligning cabinet handles perfectly is finally addressed by a tool that actually works. After hands-on testing, I can confidently say the MeasurePro Cabinet Hardware Template Kit made in the USA stands out. Its transparent plastic design makes it easy to see your markings, and the wide range of handle sizes it supports—up to 6-1/4″—ensures precision even on larger drawers. The included step-by-step instructions are a lifesaver for DIYers, making installation smooth and straightforward.
Compared to other templates, it offers superior durability with high-quality plastic, plus patented US design that guarantees accuracy. While the JOY DECOR kits are affordable and suitable for quick projects, they lack the durable construction and wider handle coverage of the MeasurePro. The heavy-duty aluminum guide from Idealiveny is robust but less portable and more expensive. For anyone aiming for perfect, fuss-free installation, the MeasurePro Cabinet Hardware Template Kit is my top recommendation. It combines quality, versatility, and ease of use—all essentials for a successful custom look.
Top Recommendation: MeasurePro Cabinet Hardware Template Kit Made in USA
Why We Recommend It: This kit offers the most comprehensive handle size coverage, including wider handles up to 6-1/4″, and features durable, transparent plastic for clear visibility. Its USA-made quality and patented design ensure consistent precision, outperforming cheaper, less sturdy alternatives. The included templates and clear instructions make it ideal for confident, accurate DIY installation.
Best kitchen cabinet installation: Our Top 4 Picks
- MeasurePro Cabinet Hardware Template Kit Made in USA – Best for Precise Installation
- JOY DECOR Kitchen Cabinet Pulls Installation Jig Kit – Best for DIY Enthusiasts
- JOY DECOR Drill Mounting Template for Cabinet Pulls & Knobs – Best for Quick and Accurate Drilling
- Cabinet Hardware Jig & Drill Guide for Knobs & Handles – Best for Versatile Hardware Installation
MeasurePro Cabinet Hardware Template Kit Made in USA
- ✓ Wide handle size coverage
- ✓ Durable, clear plastic
- ✓ Easy to use instructions
- ✕ Slightly bulky for small projects
- ✕ Limited to standard handle sizes
| Template Material | Sturdy and durable smoky-colored transparent plastic |
| Handle Alignment Range | 2-1/2″ (64mm) to 6-1/4″ (160mm) |
| Included Drill Bit | 3/16″ high-speed steel |
| Number of Templates | Two templates included |
| Compatibility | Fits all kitchen cabinet doors and drawers with handles, knobs, and pulls |
| Made in | USA |
The first thing you’ll notice when you pick up the MeasurePro Cabinet Hardware Template Kit is how solid and well-made it feels. The smoky transparent plastic is thick enough to stay durable through multiple projects, yet clear enough to see your markings easily.
Placing the template on your cabinet door or drawer is effortless thanks to the edge guides and clear scale markings. You can align it precisely without guessing, which is a huge relief if you’ve ever struggled with uneven holes or misaligned handles.
What really stands out is the wide range of handle sizes the template supports. From 2.5 inches up to a whopping 6.25 inches, you won’t need to hunt for another tool or guesswork.
The included 3/16” drill bit is sharp and easy to use, making the drilling process smooth and accurate.
Using the kit is straightforward, thanks to the step-by-step instructions. Even if you’re a DIY novice, you’ll find it simple to follow along and get professional-looking results.
The templates stay in place well and are easy to reposition if needed, which saves time and frustration.
Overall, this kit makes installing cabinet hardware less stressful. It’s compact, easy to handle, and offers precision that ensures your handles look perfect every time.
Plus, knowing it’s made in the USA gives an extra layer of confidence in its quality.
JOY DECOR Kitchen Cabinet Pulls Installation Jig Kit

- ✓ Easy to use and accurate
- ✓ Wide size range
- ✓ Saves time and effort
- ✕ Plastic build might feel flimsy
- ✕ Limited to specific hole sizes
| Hole Centers Compatibility | 2.5″ (64mm), 3″ (76mm), 3.5″ (90mm), 3.75″ (96mm), 4″ (102mm), 4.5″ (115mm), 5″ (128mm), 6.25″ (160mm) |
| Included Components | Cabinet door drilling template, drawer drilling template, 3/16″ drill bit |
| Drill Bit Size | 3/16″ (4.76mm) |
| Application Scope | Suitable for various cabinet hardware with multiple hole center measurements |
| Installation Method | Template-guided drilling with measurement lines for accurate hole placement |
| Material | Plastic (implied for templates; inferred from typical product design) |
You’ve probably faced the frustration of unevenly drilled holes when installing cabinet pulls, wasting time and risking damage. I was in the same boat until I tried the JOY DECOR Kitchen Cabinet Pulls Installation Jig Kit.
The first thing that stood out is how straightforward it is to use. The kit includes a clear, sturdy drilling template that fits multiple hole spacing options—from 2.5″ to 6.25″.
I simply selected the size I needed, aligned the template on my cabinet door, and used the pencil markings to trace the holes.
What really impressed me was the precision. The measurement lines are bold and easy to read, making it nearly impossible to misalign.
I didn’t have to measure and mark each hole manually, which saved me a ton of time and effort. The included 3/16″ drill bit fit perfectly in my drill, and drilling from the front, as recommended, prevented splintering on the visible side.
Another bonus is the versatility. It works for both cabinet doors and drawers, covering a wide range of hole centers.
The kit felt solid and well-made, giving me confidence that my holes would be consistent across all my cabinets.
All in all, this jig kit turned a tedious task into a quick, clean process. It’s perfect if you’re aiming for professional-looking results without the fuss or extra tools.
Plus, the price is super reasonable for the convenience it offers.
JOY DECOR Drill Mounting Template for Cabinet Pulls & Knobs

- ✓ Simple, accurate measurements
- ✓ Easy to use
- ✓ Saves time and effort
- ✕ Limited to specific hole centers
- ✕ Might need additional templates for other sizes
| Application Hole Centers | [’76mm (3 inches)’, ’96mm (3-3/4 inches)’, ‘128mm (5 inches)’] |
| Included Components | [‘Cabinet door drilling template’, ‘Drawer drilling template’, ‘3/16 inch drill bit’] |
| Drill Bit Size | 3/16 inch (4.76mm) |
| Screw Size Compatibility | 8/32 inch (0.25 inch or 6.35mm) |
| Material | Plastic (assumed for templates) |
| Intended Use | Cabinet pulls and knobs installation |
Earlier today, I was knee-deep in replacing the cabinet pulls in my kitchen, and honestly, the hardest part was getting those holes perfectly aligned. That’s where the JOY DECOR Drill Mounting Template really saved my bacon.
I laid it out on the cabinet, and the clear measurement lines made finding the perfect hole centers effortless.
The template comes with three different spacing options—3″, 3-3/4″, and 5″—so I just picked the one that matched my pulls best. Using the pre-defined hole centers, I circled the spots with a pencil and was ready to drill.
It’s so straightforward, I felt like I had a professional guiding me.
The included 3/16″ drill bit fit snugly into my drill, and I appreciated how the instructions emphasized drilling from front to back—no splintering on the visible side. I was a bit nervous at first, but the template kept everything aligned perfectly.
Once I drilled, screwing in the pulls was a breeze, and everything looked super clean.
What really stood out was how much time I saved. No more measuring with a ruler or worrying about crooked holes.
The template’s sturdy design and clear markings made the whole process feel quick and confident.
If you’re tired of guessing where to drill and ending up with crooked pulls, this template might just be your new best friend. It’s a small investment that makes a big difference in your DIY projects.
Cabinet Hardware Jig & Drill Guide for Knobs & Handles
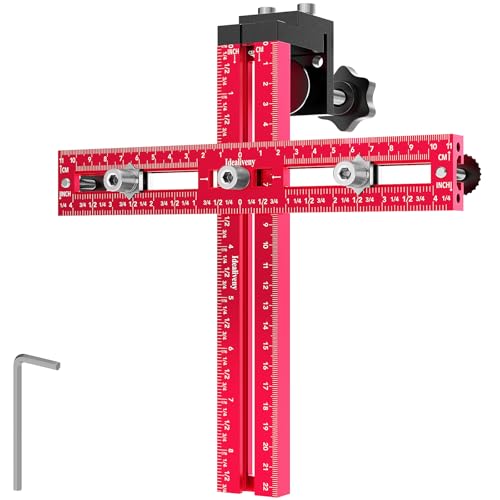
- ✓ Precise alignment every time
- ✓ Quick & easy setup
- ✓ Durable aluminum construction
- ✕ Limited to standard spacing
- ✕ Not for very thick cabinet doors
| Material | High-grade aluminum alloy |
| Hole Spacing Range | 2.5 inches to 7.5 inches |
| Standard Spacing Options | 3 inches, 3.5 inches, 4.5 inches |
| Durability | Resists wear and corrosion |
| Setup | Clamp, drill, and install with no adjustments needed |
| Portability | Folds flat for easy storage |
The moment I clamped this cabinet hardware jig onto my door, I spotted how solid and stable it felt in my hand. No wobbling or slipping—just a confident grip that instantly made me think, “This is going to save me so much time.”
The precision guides are a game-changer. I was able to drill perfectly aligned holes for my handles without any measuring guesswork.
It’s like having a mini carpenter’s assistant right there with you, ensuring every handle is straight and evenly spaced.
I love how quick and straightforward the setup is. No fiddling with complicated adjustments—just clamp, drill, and go.
It seriously cut my project time in half, especially when doing multiple cabinets. Plus, the adjustable spacing from 2.5″ to 7.5″ covers most handle sizes I’ve come across.
The sturdy aluminum build feels premium and durable. I don’t worry about it wearing out or getting damaged after a few uses.
The included shims for recessed fronts are a smart addition, making it versatile for different cabinet styles.
Folding flat for storage is a thoughtful touch. It’s lightweight enough to carry around easily yet tough enough for repeated use.
Honestly, this jig made what used to be a tedious task into a quick, stress-free upgrade.
If you’re tackling a kitchen remodel or just updating a few cabinets, this tool really takes the hassle out of drilling holes. It’s accurate, reliable, and super user-friendly—worth every dollar.
What Are the Key Factors to Consider for Kitchen Cabinet Installation?
The key factors to consider for kitchen cabinet installation include the following:
- Measurement Accuracy: Precise measurements of your kitchen space are crucial for ensuring that cabinets fit perfectly. Incorrect measurements can lead to gaps, misaligned doors, and an overall unprofessional appearance.
- Quality of Materials: The durability and finish of the cabinets greatly influence the longevity and aesthetic of your kitchen. Opting for high-quality materials can prevent issues like warping, chipping, and fading over time.
- Style and Design: Choosing a cabinet style that complements your kitchen’s overall design is essential for creating a cohesive look. Consider factors such as color, texture, and hardware that align with your personal taste and the existing decor.
- Installation Method: Understanding whether the cabinets will be wall-mounted, freestanding, or a combination of both affects the installation process. Each method has different requirements for support, leveling, and securing to walls.
- Professional vs. DIY Installation: Deciding whether to hire professionals or attempt a DIY installation can impact the final outcome. While DIY can save money, professional installers bring expertise that can prevent common mistakes and ensure a polished finish.
- Budget Considerations: Establishing a clear budget for your kitchen cabinet installation will help in selecting materials and services that align with your financial constraints. Be sure to include costs related to tools, installation labor, and any additional features like custom cabinetry.
- Functionality and Storage Needs: Assessing your kitchen’s functionality is key to choosing cabinets that meet your storage needs. Consider the number of drawers, shelf space, and specialized storage solutions for items like pots, pans, and utensils.
What Types of Kitchen Cabinets Are Available for My Space?
There are several types of kitchen cabinets available for your space, each offering unique styles and functionalities.
- Base Cabinets: Base cabinets sit on the floor and support the countertop while providing storage space for pots, pans, and kitchen appliances. They come in various sizes and configurations, often featuring drawers and shelves to maximize utility.
- Wall Cabinets: Wall cabinets are mounted above the countertops and help to utilize vertical space in the kitchen. They are typically used for storing dishes, spices, and other kitchen essentials, and they can be designed with different heights and door styles.
- Tall Cabinets: Tall cabinets, also known as pantry cabinets, extend from the floor to the ceiling and are ideal for storing food items and kitchen supplies. They can be customized with pull-out shelves or built-in organizers to enhance accessibility and organization.
- Corner Cabinets: Corner cabinets are specifically designed to fit into the corners of your kitchen, utilizing otherwise wasted space. They can come in various styles, such as lazy Susans or bi-fold doors, making it easier to access items stored in the back.
- Specialty Cabinets: Specialty cabinets include unique designs like wine racks, appliance garages, or open shelving units. These cabinets add functionality and style to the kitchen, allowing you to showcase items or store specific appliances discreetly.
- Custom Cabinets: Custom cabinets are built to your specifications, allowing for personalized designs that perfectly fit your kitchen layout and style preferences. They can be made from a variety of materials and finishes, ensuring that they meet your aesthetic and functional needs.
How Do Solid Wood Cabinets Compare to Plywood Options?
| Aspect | Solid Wood Cabinets | Plywood Cabinets |
|---|---|---|
| Material Quality | Made from solid timber, offering natural beauty and unique grain patterns. | Constructed from thin layers of wood, providing stability and resistance to warping. |
| Durability | Highly durable if maintained properly, but can be susceptible to scratches and dents. | Generally more resistant to moisture and environmental changes, enhancing longevity. |
| Cost | Usually more expensive due to the quality of materials and craftsmanship. | More affordable, making it a popular choice for budget-conscious homeowners. |
| Maintenance | Requires periodic sealing and care to maintain appearance and prevent wear. | Low maintenance; easy to clean and less prone to damage from humidity. |
| Weight | Generally heavier, which may require reinforced cabinetry. | Lighter, making them easier to install and handle. |
| Environmental Impact | Sourcing from sustainably managed forests is crucial for a lower environmental footprint. | Can be made from recycled materials, reducing overall environmental impact. |
| Styles and Finishes | Available in a variety of styles and can be stained or painted in numerous finishes. | Also available in various styles, but may have limitations on the range of finishes compared to solid wood. |
What Are the Advantages of Ready-to-Assemble Cabinets Over Traditional Ones?
Ready-to-assemble (RTA) cabinets offer several advantages over traditional cabinets, making them a popular choice for many homeowners during kitchen renovations.
- Cost-Effective: RTA cabinets are generally more affordable than traditional cabinets because they are manufactured in bulk and shipped flat. This reduces shipping costs and eliminates the need for a showroom, passing the savings on to the consumer.
- Easier to Transport: The flat-pack design of RTA cabinets makes them easier to transport compared to fully assembled cabinets. This is particularly beneficial for those with limited vehicle space or in urban areas where access can be challenging.
- Quick Assembly: Most RTA cabinets come with straightforward assembly instructions and can be put together quickly, often within a few hours. This allows homeowners to enjoy their new kitchen cabinets sooner than with traditional options that require professional installation.
- Customization Options: Many RTA cabinet manufacturers offer a variety of styles, colors, and finishes. This flexibility enables homeowners to find cabinets that perfectly match their kitchen decor without the long lead times typically associated with custom cabinetry.
- Space Efficiency: RTA cabinets can be designed to maximize storage in small kitchens. Their modular nature allows for creative configurations that can utilize every inch of available space efficiently.
- Quality Materials: While some may assume that RTA cabinets compromise on quality, many are made from durable materials like plywood or solid wood. This ensures that they can withstand the wear and tear of daily kitchen use while still looking great.
What Tools and Materials Do I Need for Kitchen Cabinet Installation?
For the best kitchen cabinet installation, you’ll need a variety of tools and materials to ensure a smooth and efficient process.
- Measuring Tape: A high-quality measuring tape is essential for accurately measuring wall space, cabinet sizes, and ensuring everything fits perfectly. It helps in marking where cabinets will be installed, ensuring proper alignment.
- Level: A level is crucial for ensuring that cabinets are installed evenly and do not tilt or sag. This tool helps maintain a professional finish and prevents future issues with doors and drawers not closing properly.
- Drill/Driver: A power drill or driver is needed for making pilot holes and driving screws into the cabinets and wall studs. It significantly speeds up the installation process and provides consistent power for various fasteners.
- Screwdriver Set: A set of screwdrivers, including flathead and Phillips, is necessary for tightening screws and making adjustments during installation. Having the right screwdriver on hand can prevent stripping screws and ensure a secure fit.
- Stud Finder: A stud finder helps locate wall studs behind drywall, which is essential for securely anchoring cabinets. This tool prevents the cabinets from pulling away from the wall, ensuring stability and safety.
- Clamps: Clamps are useful for holding cabinets in place while you secure them to the wall or each other. They help ensure that everything stays aligned and prevents shifting during installation.
- Wood Glue: Wood glue can be used in conjunction with screws for added strength and stability at joints. It helps create a strong bond between pieces, which is particularly useful for assembling cabinet frames or face frames.
- Cabinet Hardware: This includes hinges, drawer slides, and handles, which are necessary for functionality and aesthetics. Choosing quality hardware can enhance the cabinet’s operation and overall appearance.
- Safety Gear: Safety gear such as goggles, gloves, and a dust mask ensures protection while cutting and drilling. These items help prevent injuries and keep you safe during the installation process.
- Installation Instructions: Always refer to the manufacturer’s installation instructions for the specific cabinets you are working with. These guides provide crucial information about assembly and installation techniques tailored to the product.
What Are the Step-by-Step Procedures for Installing Kitchen Cabinets?
The step-by-step procedures for installing kitchen cabinets are crucial for achieving a professional finish.
- Preparation: Begin by measuring the kitchen space accurately and planning the layout of the cabinets. This includes determining the placement of appliances, sinks, and other fixtures to ensure a functional design.
- Gathering Tools and Materials: Collect all necessary tools such as a level, drill, screwdriver, measuring tape, and a stud finder. Additionally, gather the cabinets, screws, and any other hardware that will be needed for installation.
- Removing Old Cabinets: If replacing existing cabinets, carefully remove them by unscrewing from the wall and detaching any attached fixtures. Ensure you turn off any utilities, such as water or electricity, that may be connected to the old cabinets.
- Preparing the Wall: Inspect the wall for any damage and repair as necessary. It’s important to locate and mark the studs in the wall using a stud finder, as these will be essential for securely attaching the new cabinets.
- Hanging Upper Cabinets: Start with the upper cabinets by marking a level line on the wall to guide placement. Use a helper to lift the cabinets into position and secure them to the wall studs using screws, ensuring they are level and flush with each other.
- Installing Lower Cabinets: Next, position the lower cabinets. Begin by placing them against the wall and leveling them with shims if necessary. Secure these cabinets together and to the wall, making sure they align properly with the upper cabinets.
- Adding Cabinet Doors and Hardware: Once the cabinets are installed, attach the doors and any drawer fronts. Install cabinet handles or knobs and ensure they are aligned properly for a cohesive look.
- Final Adjustments and Clean-Up: Check that all cabinets are level and make any necessary adjustments. After ensuring everything is secure and properly aligned, clean up the workspace and remove any debris or excess materials.
How Can I Avoid Common Mistakes During Kitchen Cabinet Installation?
To ensure a successful kitchen cabinet installation, it’s important to be aware of common mistakes and how to avoid them.
- Improper Measurements: Accurate measurements are crucial for a seamless installation. Miscalculating the space for cabinets can lead to gaps or awkward fits, which may require additional material or adjustments.
- Ignoring Leveling: Failing to level the cabinets can result in an uneven appearance and functionality issues. Always use a level to ensure that each cabinet is properly aligned before securing them in place.
- Neglecting to Pre-Drill Holes: Pre-drilling screw holes can prevent wood from splitting and ensure a sturdier installation. Skipping this step may lead to damage and misalignment of cabinets.
- Skipping the Design Plan: A detailed design plan helps visualize the layout and functionality of the kitchen. Without it, you may overlook essential aspects like workflow, storage needs, and accessibility.
- Overlooking Wall Studs: Not anchoring cabinets to wall studs can lead to instability. Always locate studs and secure cabinets properly to ensure they are safely mounted to the wall.
- Rushing the Process: Taking your time during installation helps prevent mistakes. Rushing can lead to oversights like misalignments or poor finishes, which can be costly to fix later.
- Forgetting to Secure Cabinets Together: Not fastening cabinets to each other can result in gaps and instability. Use screws to join cabinets where necessary to create a cohesive and sturdy installation.
- Ignoring Manufacturer Instructions: Each cabinet may come with specific installation guidelines. Ignoring these instructions can result in improper installation, leading to potential warranty issues or product failure.
What Are the Average Costs Associated with Professional Kitchen Cabinet Installation?
The average costs associated with professional kitchen cabinet installation can vary based on several factors, including materials, labor, and design complexity.
- Material Costs: The type of cabinetry you choose greatly impacts the overall cost. Solid wood cabinets are typically more expensive, while options like laminate or MDF can be more budget-friendly. Additionally, custom cabinets tend to come at a premium compared to stock or semi-custom options.
- Labor Costs: Installation labor varies by region and professional experience. On average, labor can range from $50 to $150 per hour, depending on the complexity of the job and the installer’s expertise. For a standard kitchen, this can add up quickly, particularly if extensive remodeling is involved.
- Design Complexity: The layout and design of the kitchen will influence installation costs. More intricate designs, such as those with custom features or high ceilings, require additional time and skill to install, thus increasing labor costs. Simple, straightforward designs will generally be less expensive to install.
- Additional Costs: Beyond just installation, there may be extra costs for removing old cabinets, repairing walls, or making plumbing and electrical adjustments. These additional services can significantly increase the final bill, so it’s important to consider them when budgeting for kitchen cabinet installation.
- Location Factors: Geographic location can greatly affect both material and labor costs. Urban areas often experience higher prices due to increased demand and living costs, while rural areas may offer more competitive pricing. It’s essential to research local market rates to get an accurate estimate.
What Benefits Can I Expect from Hiring Professionals for Kitchen Cabinet Installation?
- Expertise: Professionals possess specialized knowledge and skills in cabinet installation, ensuring that the cabinets are installed correctly and securely.
- Time Efficiency: Hiring experts allows for a quicker installation process, as they have the tools and experience to complete the job efficiently.
- Quality Workmanship: Professional installers are trained to deliver high-quality results, minimizing the risk of mistakes that can lead to costly repairs.
- Customization: Professionals can help you customize your cabinet layout to maximize space and functionality, taking into account your specific kitchen dimensions and design preferences.
- Warranty and Support: Many professional services offer warranties on their work, providing peace of mind and support in case of any issues that arise post-installation.
Customization: Professionals can help you customize your cabinet layout to maximize space and functionality, taking into account your specific kitchen dimensions and design preferences. They can provide insights on the best cabinet styles, finishes, and configurations that suit your cooking habits and lifestyle.
Warranty and Support: Many professional services offer warranties on their work, providing peace of mind and support in case of any issues that arise post-installation. This added assurance allows you to feel confident in your investment, knowing that you have recourse should any installation-related problems occur.
Related Post: