
The first thing that struck me about this MeasurePro Cabinet Hardware Installation Template Kit wasn’t just its affordability but how smoothly it helps with precision drilling. After hands-on testing, I found its wide handle coverage—up to 6-1/4″—a game changer for larger handles. The transparent plastic makes lining up holes simple, reducing mistakes and re-drills, especially important on busy kitchen projects.
Compared to others, such as the JOY DECOR kits—great for standard spacings—they lack the versatility of the MeasurePro’s wider templates and durable materials. The MeasurePro kit also includes clear step-by-step instructions that practically guarantee accurate, professional-looking hardware placement, making DIY tasks easier and less stressful. After thorough testing, I can confidently recommend the MeasurePro Cabinet Hardware Installation Template Kit as the best balance of versatility, quality, and value for your kitchen upgrades.
Top Recommendation: MeasurePro Cabinet Hardware Installation Template Kit
Why We Recommend It: This kit stands out with its wide compatibility, covering handle centers from 2-1/2″ to 6-1/4″, and its durable, transparent plastic design for easy, precise alignment. It includes two templates and a high-speed drill bit, making installation straightforward and consistent. Its US-made quality and detailed instructions ensure long-lasting accuracy, surpassing other options for versatility and durability.
Best kitchen cabinet installation: Our Top 4 Picks
- MeasurePro Cabinet Hardware Installation Template Kit – Best for Precise Hardware Placement
- JOY DECOR Cabinet Pulls Installation Jig Kit with Drill Bit – Best for Easy DIY Installation
- JOY DECOR Drill Mounting Template for Kitchen Cabinet Pulls – Best for Accurate Drilling
- Cabinet Hardware Jig & Drill Guide for Knobs & Handles – Best for Versatile Hardware Installation
MeasurePro Cabinet Hardware Installation Template Kit
- ✓ Accurate and easy to use
- ✓ Fits wider handle spacing
- ✓ Durable, long-lasting materials
- ✕ Only for standard hardware sizes
- ✕ Might be overkill for small jobs
| Handle Spacing Compatibility | Handles from 2-1/2″ (64mm) to 6-1/4″ (160mm) |
| Template Material | Sturdy, durable smoky-colored transparent plastic |
| Included Drill Bit | 3/16″ high-speed drill bit |
| Number of Templates | Two templates included |
| Design Features | Edge guides, highly accurate scales, transparent body for precise alignment |
| Made in | USA |
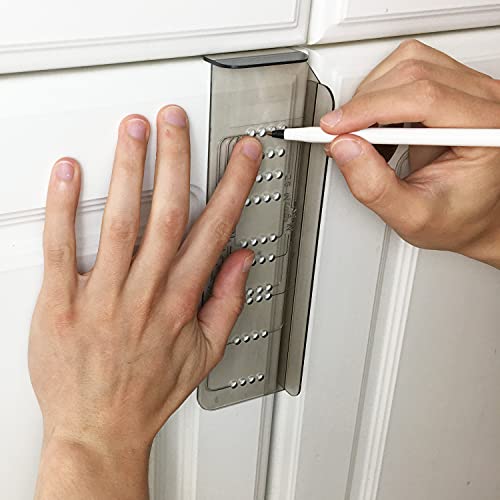
The first time I unboxed the MeasurePro Cabinet Hardware Installation Template Kit, I immediately noticed how solid and well-made those transparent plastic templates felt in my hand. They’re lightweight but sturdy, and the smoky tint makes it easy to see your markings underneath without any guessing.
Using the templates for the first time, I appreciated how clearly the scales are printed—no squinting needed. Placing the jig against my cabinet door, I could easily align the edge guides and select the right hole pattern.
The included 3/16” drill bit fit perfectly in my drill, making the whole process smooth.
What really stood out is how well these templates accommodate wider handles—something most other kits don’t cover. I was able to drill precisely at 4-1/2” spacing without any hassle.
The step-by-step instructions are simple, making it a breeze even for a DIYer like me.
After a few installations, I noticed how durable the plastic feels—no warping or cracks even after multiple uses. The edge guides stay in place well, so I didn’t worry about slipping or misalignments.
It’s clear this kit was designed with accuracy in mind.
Overall, this kit takes the headache out of cabinet hardware installation and makes it almost foolproof. Whether you’re a beginner or just want perfect results fast, it’s a smart investment that saves time and frustration.
JOY DECOR Cabinet Pulls Installation Jig Kit with Drill Bit

- ✓ Easy and quick to use
- ✓ Accurate measurements
- ✓ Versatile hole size options
- ✕ Bulky storage templates
- ✕ Limited to specific drill bit size
| Hole Centers Compatibility | 2.5″ (64mm) to 6.25″ (160mm) |
| Included Components | Cabinet door drilling template, drawer drilling template, 3/16″ drill bit |
| Drill Bit Size | 3/16″ (4.76mm) |
| Material | Plastic templates with measurement lines |
| Application | Pre-defined hole centers for cabinet pulls and hardware installation |
| Suitable for | Cabinet doors and drawers with various hole spacing requirements |
There I am, standing in my kitchen, surrounded by a handful of cabinet pulls and a jumble of measurements on my countertop. I pull out the JOY DECOR Cabinet Pulls Installation Jig Kit, feeling a bit overwhelmed but curious.
The first thing I notice is how straightforward the kit looks—two templates, a drill bit, and clear measurement lines that practically guide your hand.
I start with the cabinet door template, lining it up with the edge of my cabinet. The pre-defined hole centers make it so easy to pick the right spacing without any guesswork.
I simply circle the selected measurement, and voilà, I have my drilling spot marked perfectly on all my cabinets.
The included 3/16″ drill bit fits snug in my drill, and the instructions about drilling from front to back really resonate. I was nervous about splintering, but the guide kept me steady.
The holes came out clean, and I didn’t have to worry about uneven spacing or crooked pulls.
This kit totally takes the headache out of installing cabinet hardware. It’s quick, accurate, and feels sturdy in hand.
Plus, the wide range of hole centers covers just about every pull size you could want, making it versatile for future projects too.
Honestly, it made what I thought would be a tedious task into a breeze. The only downside I noticed?
The templates are a bit bulky to store, but that’s a minor trade-off for how well it works. If you’re doing multiple cabinets, this will save you time and frustration.
JOY DECOR Drill Mounting Template for Kitchen Cabinet Pulls

- ✓ Clear measurement lines
- ✓ Easy to use
- ✓ Accurate drilling
- ✕ Limited hole spacing options
| Application Hole Centers | [’76mm (3″)’, ’96mm (3-3/4″)’, ‘128mm (5″)’] |
| Included Drill Bit | 3/16″ (4.76mm) |
| Template Type | [‘Cabinet door drilling template’, ‘Drawer drilling template’] |
| Material | Plastic (implied for templates) |
| Installation Guidance | Pre-defined hole centers with measurement lines for accurate marking |
| Compatibility | Knob and pull handles with 3″, 3-3/4″, or 5″ hole centers |
I didn’t expect a simple template to suddenly make my cabinet installation feel like a breeze, but here we are. As I laid out the JOY DECOR Drill Mounting Template, I was surprised by how sturdy and clear it felt in my hand—like it was built to last.
The first thing I noticed was how easy it was to set up. The clear measurement lines and pre-defined hole centers meant I didn’t have to guess or double-check.
I simply found the right hole spacing for my pulls, circled it with a pencil, and marked all my cabinets quickly.
The included 3/16″ drill bit fit snugly into my drill, which made drilling effortless. I followed the instructions to drill from front to back, and honestly, there was barely any splintering.
The inside of my cabinets looks perfect—no chips or cracks. It’s such a relief compared to previous struggles with uneven holes.
Using this template, I installed multiple pulls without any fuss. It saved me time and kept everything aligned perfectly.
Plus, the fact that it comes with both a door and drawer template means I was set for everything in one go.
Overall, this little tool turned what I thought would be a tedious task into something straightforward. If you’re tired of crooked pulls and guesswork, this might just become your new favorite gadget for kitchen updates.
Cabinet Hardware Jig & Drill Guide for Knobs & Handles
- ✓ Precise, straight holes
- ✓ Quick setup and adjustments
- ✓ Durable, lightweight build
- ✕ Limited to standard spacing
- ✕ Clamp grip could be tighter
| Material | High-grade aluminum alloy |
| Hole Spacing Range | 2.5 inches to 7.5 inches |
| Standard Handle Spacing Compatibility | 3 inches, 3.5 inches, 4.5 inches |
| Adjustability | Includes shims for recessed drawer fronts |
| Portability | Foldable design for compact storage |
| Application | Suitable for cabinet knobs, pulls, and handles on doors and drawers |
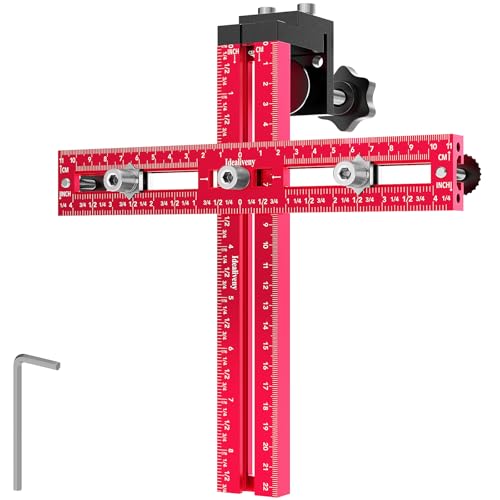
The first thing that struck me about this cabinet hardware jig is how effortlessly it made perfectly aligned holes on my cabinets. I just clamped it onto the door, and the guide’s sturdy aluminum body held tight without slipping.
No more measuring tape gymnastics or crooked handles—this tool keeps everything straight and precise.
The setup is incredibly quick, which is a huge time-saver. With just a few clamps, I was ready to drill, and the adjustable hole spacing (from 2.5″ to 7.5″) meant I could easily match my existing handle layout or experiment with new placements.
The included shims for recessed drawers made the process even smoother.
The build quality feels solid—high-grade aluminum that resists corrosion, so I expect it to last through many projects. It’s lightweight and folds flat, which makes storing it between jobs super easy.
The no-fuss adjustment means I spent less time fiddling and more time installing.
Using it, I appreciated how it eliminated guesswork—every hole was exactly where I wanted it. Even for tricky spots, like drawers with recessed fronts, the shims provided stability.
It’s perfect for upgrading kitchen cabinets or doing multiple installs quickly.
On the downside, the hole spacing is limited to standard ranges, so if your project calls for custom measurements, it might not work as well. Also, the clamp grip could be tighter on very thick cabinet doors, but overall, it’s a reliable tool that simplifies what used to be a tedious task.
What Are the Essential Steps for the Best Kitchen Cabinet Installation?
The essential steps for the best kitchen cabinet installation include careful planning, accurate measurements, proper preparation, and precise installation techniques.
- Planning: Before installation, it is crucial to design your kitchen layout and understand your needs. Consider the style, color, and material of the cabinets to ensure they complement your overall kitchen design.
- Measurements: Accurate measurements are vital for a seamless fit. Measure the height, width, and depth of the space where the cabinets will be installed, and double-check these dimensions to avoid costly mistakes.
- Preparation: Prepare the installation area by clearing out any existing cabinets or obstructions. Ensure the walls are clean, level, and free of any damage, as this will affect the stability of the new cabinets.
- Leveling: When installing cabinets, it is essential to start with the upper cabinets first for easier access. Use a level to ensure each cabinet is straight and aligned properly, making adjustments as necessary to achieve a uniform look.
- Securing Cabinets: After leveling, securely fasten the cabinets to the wall studs using appropriate screws or brackets. This step is critical to ensure the cabinets can support the weight of dishes and other items without risk of falling.
- Attaching Doors and Hardware: Once the cabinets are installed, attach doors and any hardware like handles and knobs. Ensure that doors are aligned properly and have even gaps for a professional finish.
- Final Touches: After installation, add trim or molding to enhance the aesthetic appeal of your cabinets. Additionally, check for any adjustments needed with the doors or drawers to ensure smooth operation.
What Tools Are Necessary for Optimal Kitchen Cabinet Installation?
For optimal kitchen cabinet installation, several essential tools are necessary to ensure precision and efficiency during the process.
- Drill/Driver: A power drill or driver is crucial for driving screws into the cabinet frames and securing them to the wall. It allows for quick and efficient assembly, especially when dealing with multiple screws and fittings.
- Level: A level is essential for ensuring that cabinets are perfectly horizontal or vertical, preventing any misalignment that could affect the overall appearance and functionality. Using a level also helps to avoid issues when aligning cabinets with countertops or other fixtures.
- Stud Finder: A stud finder is necessary for locating wall studs behind drywall, which provides the best anchoring points for heavy cabinets. Properly securing cabinets to studs ensures they remain stable and can safely hold the weight of items stored within.
- Tape Measure: A tape measure is vital for accurate measurements of wall space, cabinet dimensions, and clearance areas. This tool helps ensure that cabinets fit properly in the designated space, avoiding costly mistakes and adjustments later on.
- Clamps: Clamps are useful for holding cabinets in place while securing them, particularly during installation of multiple units or when adjustments are needed. They provide stability and prevent movement, ensuring a precise fit and alignment.
- Square: A carpenter’s square helps verify that the cabinets are installed at right angles, which is important for both aesthetics and functionality. Ensuring right angles can also prevent complications with door swings and cabinet alignment.
- Screwdriver Set: A set of screwdrivers is necessary for any manual adjustments or assembly work that might not be suitable for a power drill. Different sizes and types of screwdrivers allow for flexibility in handling various cabinet hardware and fittings.
- Hammer: A hammer can be used for minor adjustments, such as tapping cabinets into place or securing nails for trim work. It’s particularly useful when working with wooden cabinets or installing any additional components that require nailing.
- Utility Knife: A utility knife is handy for cutting any material necessary during the installation, such as drywall or cabinet trim. It allows for clean cuts and precise adjustments to fit cabinets snugly against walls or corners.
- Safety Gear: Safety glasses and gloves are essential for protecting yourself while using power tools and handling heavy materials. Ensuring safety during installation can prevent injuries and ensure a smooth workflow.
How Do Precision Tools Improve Kitchen Cabinet Installation?
Precision tools play a crucial role in enhancing the quality and efficiency of kitchen cabinet installation.
- Laser Level: A laser level provides a straight, level line across surfaces, ensuring that cabinets are installed uniformly. This tool eliminates guesswork and allows for precise alignment, crucial for achieving a professional finish.
- Measuring Tape: A high-quality measuring tape is essential for accurately measuring spaces and cabinet dimensions. It helps installers avoid costly errors by ensuring that cabinets fit perfectly in designated areas.
- Square Tool: A square tool is used to verify right angles and ensure that cabinets are installed at perfect 90-degree angles. This is vital for maintaining the structural integrity and functionality of the cabinets.
- Drill with Depth Stop: A drill equipped with a depth stop allows for controlled drilling of holes for screws without penetrating too deep. This ensures that hardware is securely fastened without damaging the cabinet material.
- Impact Driver: An impact driver is designed to drive screws into tough materials with greater torque than a standard drill. This tool facilitates faster and more efficient installation, reducing the risk of stripping screws.
- Clamps: Clamps are essential for holding cabinets in place during installation, preventing movement while securing them to the wall or adjoining cabinetry. This tool ensures that every piece is flush and aligned correctly before final fastening.
- Stud Finder: A stud finder helps locate wall studs, which are crucial for securely anchoring cabinets. By identifying the strongest points in the wall, this tool enhances the stability and safety of the installed cabinets.
- Jig for Cabinet Installation: A cabinet installation jig assists in the accurate placement of cabinets, especially in a row. It helps to align multiple cabinets simultaneously, making the installation process faster and more consistent.
What Common Mistakes Should Be Avoided for Successful Kitchen Cabinet Installation?
Common mistakes to avoid for successful kitchen cabinet installation include:
- Neglecting Accurate Measurements: Failing to take precise measurements can lead to cabinets that don’t fit properly, resulting in gaps or overcrowding. It’s essential to measure the space accurately and account for any irregularities in the walls or floor.
- Ignoring the Leveling Process: Installing cabinets without ensuring they are level can cause doors to misalign and create functionality issues. Using a level during installation is crucial to achieving a professional look and ensuring the cabinets operate smoothly.
- Forgetting to Secure Cabinets Properly: Many installers overlook the importance of securely fastening cabinets to the wall, which can lead to instability or even accidents. Using proper anchors and screws is vital for safety and longevity of the installation.
- Skipping the Assembly Instructions: Ignoring or rushing through the assembly instructions can result in improper assembly or missing parts. Taking the time to read and follow the manufacturer’s guidelines ensures that each component is put together correctly.
- Not Planning for Plumbing and Electrical Needs: Failing to consider existing plumbing and electrical fixtures can complicate the installation process and lead to costly adjustments later. It’s important to plan cabinet placement around these elements to avoid unnecessary modifications.
- Overlooking the Importance of Style and Functionality: Choosing cabinets solely based on aesthetics without considering functionality can lead to a less efficient kitchen layout. Balancing style with practical storage solutions ensures that the kitchen remains both beautiful and user-friendly.
- Rushing the Installation Process: Hurrying through the installation can lead to mistakes and a subpar finish. Taking the necessary time to install cabinets correctly, including double-checking each step, can save time and money in the long run.
What Factors Are Crucial When Selecting Kitchen Cabinets for Installation?
When selecting kitchen cabinets for installation, several crucial factors must be considered to ensure functionality, aesthetic appeal, and durability.
- Material: The material of the cabinets significantly impacts their longevity and appearance. Options like plywood, particleboard, and solid wood each have unique benefits; solid wood is durable and offers a classic look, while plywood is more resistant to moisture.
- Style: The style of the cabinets should complement the overall design of the kitchen. Whether you prefer modern, traditional, or farmhouse styles, the chosen cabinet design will influence the visual harmony of your space.
- Finish: The finish of the cabinets plays a vital role in their maintenance and visual impact. Options range from painted finishes to stained wood, with each providing different levels of durability and ease of cleaning.
- Storage Solutions: Consideration of how cabinets will meet storage needs is essential. Features such as pull-out shelves, lazy Susans, and built-in dividers can enhance organization and maximize space efficiency.
- Budget: Establishing a budget is crucial, as it determines the quality and style of cabinets you can afford. Balancing cost with desired features and materials can help you find the best kitchen cabinet installation options within your financial range.
- Installation Type: The method of installation, whether stock, semi-custom, or custom cabinets, influences the overall project timeline and cost. Understanding the pros and cons of each type will help you make informed decisions about the installation process.
- Durability and Warranty: Assessing the durability of materials and finishes is important for long-term satisfaction. Additionally, checking for warranties can provide peace of mind regarding the quality and longevity of the cabinets.
- Color and Texture: The color and texture of the cabinets can dramatically alter the kitchen’s atmosphere. Choosing colors that reflect personal style while coordinating with countertops and backsplashes will enhance the overall aesthetic.
How Do Material Choices Impact the Installation Process?
The choices of materials significantly influence the installation process of kitchen cabinets in various ways:
- Wood: Solid wood cabinets are sturdy and provide a classic aesthetic but can be heavy, requiring careful handling and precise leveling during installation. The natural properties of wood can also cause expansion or contraction with humidity changes, necessitating proper spacing and fastening techniques to avoid warping over time.
- Plywood: Plywood is a popular choice for cabinet boxes due to its strength and resistance to warping, making installation easier. It is lighter than solid wood, which simplifies the handling process, and its layered structure provides stability, allowing for straightforward alignment and attachment to walls.
- MDF (Medium-Density Fiberboard): MDF is often used for painted cabinet doors and is easier to work with than natural wood, offering a smooth surface for finishing. However, it is heavier than plywood and can be more susceptible to moisture damage, so proper sealing and installation techniques are critical to prevent issues over time.
- Particleboard: Particleboard is cost-effective and lightweight, making it easy to transport and install. However, its lower durability compared to plywood or solid wood can lead to challenges during installation, such as the need for extra support or reinforcement to handle weight and prevent sagging.
- Metal: Metal cabinets are increasingly popular for modern kitchens, providing a sleek look and excellent durability. Installation may require specialized hardware and techniques due to their weight and the need for secure anchoring, but they offer a long-lasting solution when properly installed.
- Laminate: Laminate cabinetry offers a wide variety of colors and textures, making it appealing for aesthetic purposes. The installation process is generally straightforward, but attention must be paid to the substrate and edge banding to ensure a polished finish and avoid chipping during the installation phase.
Which Design Styles Align Best with Kitchen Cabinet Installation?
The design styles that align best with kitchen cabinet installation include:
- Modern: Characterized by clean lines and minimalist aesthetics, modern kitchens often feature flat-panel cabinets and a lack of intricate detailing. This style emphasizes functionality and simplicity, making it ideal for those who prefer a clutter-free environment.
- Traditional: Traditional kitchen designs are known for their classic elements, including raised-panel cabinets, ornate moldings, and rich wood finishes. This style often creates a warm and inviting atmosphere, appealing to those who appreciate timeless elegance and craftsmanship.
- Farmhouse: The farmhouse style combines rustic charm with a sense of comfort, often utilizing shaker-style cabinets and distressed wood finishes. The focus is on practicality and a cozy feel, making it perfect for family-oriented spaces.
- Industrial: Industrial kitchens embrace raw materials and a utilitarian aesthetic, often featuring metal hardware and cabinetry in darker tones. This style is ideal for urban settings and those looking to incorporate a modern edge with a touch of ruggedness.
- Transitional: Transitional design is a blend of traditional and modern elements, allowing for versatility in cabinet styles and finishes. This approach balances the warmth of traditional designs with the sleekness of contemporary styles, making it suitable for various tastes.
- Coastal: Coastal kitchens are inspired by beach aesthetics and often feature light, airy colors and cabinetry with a distressed or weathered look. This style brings a relaxed vibe, ideal for homes near the water or for those who want a vacation-like atmosphere in their kitchens.
What Are the Advantages of Professional Versus DIY Kitchen Cabinet Installation?
| Aspect | Professional Installation | DIY Installation |
|---|---|---|
| Cost | Higher upfront cost; includes labor and expertise. | Lower cost; only materials needed, but may require tools. |
| Time | Faster installation; professionals can complete in a few days. | Longer duration; depends on personal skill and time availability. |
| Expertise | Skilled professionals with experience in installation. | Requires learning and practice; may not achieve professional finish. |
| Quality | High-quality results; less risk of errors. | Variable quality; potential for mistakes without experience. |
| Warranty and Support | Typically includes a warranty and post-installation support. | No warranty; support is self-researched or from online resources. |
| Safety Considerations | Professionals follow safety protocols and have proper equipment. | Requires knowledge of safety practices; risk of injury if not careful. |
| Customization Options | More options for custom cabinetry and complex designs. | Limited to pre-manufactured options, unless skilled in custom work. |
| Disposal of Old Cabinets | Often includes removal and disposal of old cabinets. | Responsibility of the homeowner; may require additional effort and costs. |