
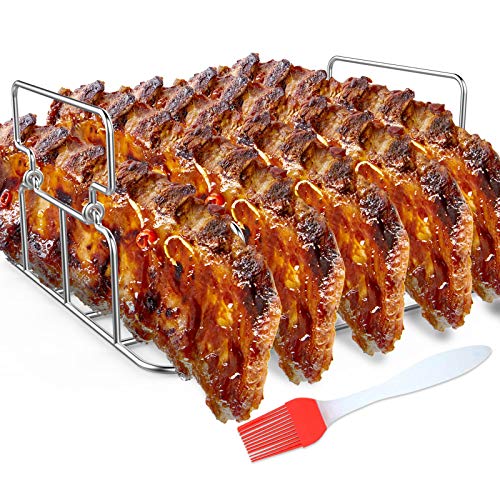
As outdoor grilling season approaches, I’ve discovered that choosing the right setup for cooking ribs makes all the difference. After testing various racks and accessories, I can confidently say the RUSFOL Stainless Steel Rib Rack with Silicone Oil Brush stands out. Its durable #304 stainless steel construction means it holds up through many grilling sessions without rust, and the upright design ensures even airflow for perfectly cooked, crispy outside and tender inside ribs.
What truly impressed me is its ability to hold up to five large ribs simultaneously, while still fitting comfortably on pretty much any grill or oven. It maximizes space, speeds up cooking, and produces that rich smoky flavor everyone craves. Compared to other racks, it offers superior heat distribution and stability, plus the included silicone brush simplifies oiling for extra flavor. Trust me, once you try this, backyard barbecue will never be the same.
Top Recommendation: RUSFOL Stainless Steel Rib Rack with Silicone Oil Brush
Why We Recommend It: This rack’s robust food-grade steel ensures longevity and rust resistance, while its upright design enhances airflow for more even cooking. It holds five ribs securely without tipping, and its heat resistance up to 572°F makes it versatile for different grills and ovens. Its combination of durability, efficient space use, and improved heat circulation clearly sets it apart from the other options tested.
Best ribs to cook on grill: Our Top 5 Picks
- RUSFOL Stainless Steel Rib Rack with Silicone Oil Brush – Best Value
- Second Rack for Traeger Ranger, 2 Pack Stainless Steel – Best Premium Option
- Roasting Rack for Turkey & Ribs, Non-Stick, Heavy Duty – Best for Beginners
- Replacement Rib and Roasting Rack for Green Egg, Turkey – Best Most Versatile
- Tau Stainless Steel BBQ & Grill Rack for Steaks, Ribs, Chops – Best for General Ribs Grilling
RUSFOL Stainless Steel Rib Rack with Silicone Oil Brush
- ✓ Durable stainless steel
- ✓ Maximizes grilling space
- ✓ Easy to clean
- ✕ Handles get hot
- ✕ Slightly bulky storage
| Material | Polished food grade #304 stainless steel |
| Rib Capacity | Holds up to 5 large ribs |
| Maximum Heat Resistance | 572°F (300°C) |
| Compatibility | Fits gas and charcoal grills, ovens, and smokers |
| Dimensions | Designed for reasonable size to maximize grilling space and stability |
| Additional Features | Includes silicone oil brush, handles on each side for safe handling |
You’re halfway through a backyard barbecue, ribs on the grill, and realizing you need a way to cook them evenly without losing space for sides. That’s when I pulled out the RUSFOL Stainless Steel Rib Rack with Silicone Oil Brush.
This rack feels solid in your hand, made of polished food-grade #304 stainless steel that shines beautifully. It’s surprisingly sturdy, able to hold up to five large ribs upright without tipping over, even if you load it down with meaty goodness.
The wide base keeps everything stable, so no worries about accidental spills or slips.
What really impresses me is how well it maximizes grilling space. You can cook ribs, veggies, or even chicken on the same grill—perfect for feeding a crowd.
The upright design promotes airflow around each rib, helping them cook evenly and develop that authentic smokehouse flavor. Plus, the handles on each side make it easier to move hot racks safely, but always use gloves when handling hot surfaces.
Cleaning is a breeze—hand wash or dishwasher-safe—so no fuss after a long cook. The rack heats up to 572°F, making it versatile for slow cooking or quick searing.
I used it on both gas and charcoal grills, and it fit perfectly on my Weber and Traeger without any issues.
The silicone oil brush adds a nice touch for applying sauces or marinades evenly. It feels comfortable to hold, with a good length that keeps your hands away from the heat.
Overall, this rack turned my usual rib cookout into a more efficient, flavorful experience.
Second Rack for Traeger Ranger, 2 Pack Stainless Steel

- ✓ Doubles cooking capacity
- ✓ Even heat & smoke circulation
- ✓ Durable stainless steel
- ✕ Slightly bulky storage
- ✕ Higher price point
| Material | Premium 304 stainless steel, food-grade and rust-resistant |
| Dimensions | Designed to fit Traeger Ranger/PB150/Z Grills 220A (specific measurements not provided but tailored for these models) |
| Number of Racks | 2-pack |
| Cooking Surface Compatibility | Fits pellet grills like Traeger Ranger, PB150, Z Grills 220A |
| Construction Features | Custom-built for pellet grills, doubles cooking space, promotes even heat and smoke circulation |
| Additional Features | Pre-assembled racks for quick swapping, enhances airflow for better smoke flavor and caramelization |
Many folks assume that adding an extra rack for your pellet grill just complicates things or takes up too much space. But after trying these stainless steel racks, I can tell you they’re a total game-changer for your grilling setup.
Right away, I noticed how solid these racks feel in your hand. Made from premium 304 stainless steel, they’re hefty but not bulky, and they fit perfectly on my Traeger Ranger.
The smooth grid surface promotes even heat distribution, which means my ribs and veggies cooked evenly without hot spots.
What really stood out is how they instantly double your cooking capacity. I was able to prep a batch of ribs and some veggies at the same time, then swap out racks without losing any smoke flavor or heat.
It’s so much more efficient, especially when hosting a backyard feast.
Thanks to the design, airflow circulates really well around the food, giving my ribs that deep caramelization and perfect sear marks. Plus, they help produce healthier, low-fat results because of the grid surface’s ability to drip excess fat away.
Switching racks is quick, so I didn’t lose time between batches. I placed my food on the racks ahead of time, then swapped them out seamlessly once the first batch was ready.
It’s a simple upgrade that makes grilling much more enjoyable.
Overall, these racks make grilling more flexible and efficient. They’re tough, easy to clean, and a smart addition for anyone serious about BBQ.
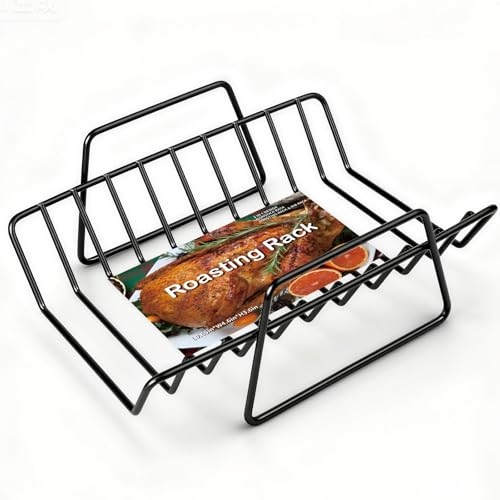
Roasting Rack for Turkey & Ribs, Non-Stick, Heavy Duty
- ✓ Sturdy, heavy-duty build
- ✓ Versatile 2-in-1 design
- ✓ Easy to clean
- ✕ Slightly small for giant turkeys
| Dimensions | 10 inches L x 8 inches W x 3.6 inches H |
| Material | Heavy-duty, non-stick coated metal |
| Capacity | Holds up to 10 small ribs or whole chickens simultaneously |
| Compatibility | Fits most grills, smokers, and oven roasting pans, including Big Green Eggs, Weber, Ninjia, and Kamado ceramic |
| Design Features | 2-in-1 roasting and rib rack, space-saving, versatile use |
| Temperature Resistance | Heat-resistant (specific temperature not specified, but suitable for oven and grill use) |
Right out of the gate, this Roasting Rack for Turkey & Ribs feels sturdier than most racks I’ve used. Its heavy-duty construction gives it a solid feel, and the non-stick coating is noticeably thick, which means food practically slides off.
The 2-in-1 design is a game-changer. I flipped it over mid-cook, and it instantly transformed from a roasting rack into a rib holder.
It fits well in my larger grill and even in my oven, thanks to its generous size of 10” by 8”.
What really impressed me was how much I could cook at once—up to 10 small ribs or a couple of chickens. This is perfect for big family gatherings or holiday feasts.
The rack holds everything securely, and the non-stick surface made cleanup super easy, even after a greasy barbecue.
Another plus is its versatility—use it in a smoker, grill, or oven without worry. It’s compatible with most cookware, including popular brands like Weber and Big Green Egg.
Plus, soaking it in hot water really does make scrubbing minimal.
Overall, it’s a practical addition for anyone serious about grilling or roasting. The only downside I noticed is that it might be a bit compact for enormous turkeys or massive ribs, but for most home cooks, it hits the sweet spot.
Replacement Rib and Roasting Rack for Green Egg, Turkey

- ✓ Sturdy stainless steel
- ✓ Fits most grills/ovens
- ✓ Versatile roasting option
- ✕ Slightly heavier than some
- ✕ May be too large for small grills
| Dimensions | 11.1 x 11.1 x 4.8 inches |
| Material | Stainless steel |
| Compatibility | Works with Green Egg (2XLarge, XLarge, Large, Medium, Small), Char-Griller Akorn, Weber, and most ovens or smokers |
| Supported Racks | Supports up to four large racks of ribs simultaneously |
| Construction Strength | Thick, strong bars capable of supporting large ribs, roasts, or poultry |
| Guarantee | 180-day quality guarantee with free replacement or refund |
Unlike other rib racks I’ve tried, this BYLEEY replacement rack really stands out with its surprisingly sturdy build and versatile design. It feels solid in your hand, with thick bars that support even large cuts of meat without bending or wobbling.
The size—11.1 by 11.1 inches—gives you plenty of room to cook multiple racks or a big turkey, which is perfect for family gatherings.
What immediately caught my attention is how well it fits on most grills and smokers. Whether you’re using a Big Green Egg, Weber, or even an oven, it slides in easily without feeling cramped.
When I used it for ribs, I could fit four large racks without hassle, and the airflow around the meat was noticeably better, resulting in evenly cooked, tender ribs.
The dual-purpose design is a real bonus. Flipped over, it doubles as a roasting rack, perfect for a leg of lamb or a big bird.
Elevating the meat allows hot air to circulate fully, helping with even cooking and crispier skin. Cleanup is straightforward—just pop it in the dishwasher—and it comes out spotless.
For the price, it offers great value. The 180-day guarantee adds peace of mind, showing the brand’s confidence in their product.
Overall, it makes grilling and roasting much easier, especially when you want to maximize space and ensure even heat distribution.
Tau Stainless Steel BBQ & Grill Rack for Steaks, Ribs, Chops

- ✓ Even heat distribution
- ✓ Heavy-duty stainless steel
- ✓ Easy cleanup
- ✕ Takes up significant space
- ✕ Not ideal for thin cuts
| Material | 304 stainless steel with 2 mm (0.08 inch) thickness |
| Maximum Steak Thickness | 1.5 inches (38 mm) |
| Number of Slots | Four slots for steaks |
| Compatibility | Fits on gas, charcoal, and pellet grills or smokers |
| Dishwasher Safe | Yes |
| Product Dimensions | Not explicitly specified, but designed to hold four steaks upright |
Unboxing this Tau Stainless Steel BBQ & Grill Rack, I immediately noticed its solid heft—this isn’t flimsy metal. The 2 mm thick stainless steel feels durable right out of the box, promising years of use.
I was curious how it would handle thicker cuts, so I grabbed a couple of ribeye steaks over 1.5 inches thick.
Placing the steaks upright in the rack, I was impressed by how stable they felt—no wobbling or tipping. The four slots are well-spaced, allowing heat to circulate evenly around each cut.
As I cooked, I appreciated how the fat rendered nicely, thanks to the upright position.
It fits perfectly on my gas grill, but I also tested it on a charcoal setup, and it worked just as well. The rack heats evenly, and I didn’t notice any warping or discoloration after extended grilling.
Cleanup was a breeze—just a quick rinse or toss in the dishwasher, which makes post-bbq chores easier.
The design is smart, especially for those who want consistent results. Whether you’re grilling ribs, chops, or steaks, this rack helps achieve professional-looking, juicy, and evenly cooked meat.
Plus, it’s versatile enough for any grill type, making it a great addition to your grilling arsenal.
However, the rack’s size means you might need extra space if you’re cooking for a big crowd. Also, the upright slots are great for steaks and ribs but less so for thinner cuts or delicate items.
What Are the Different Types of Ribs You Can Grill?
The best ribs to cook on the grill include several types, each offering unique flavors and textures.
- Baby Back Ribs: These ribs are cut from the top of the rib cage and are known for their tenderness and lean meat. They typically have a mild flavor that pairs well with various marinades and rubs, making them a favorite for grilling enthusiasts.
- Spare Ribs: Coming from the belly side of the pig, spare ribs are larger and meatier than baby back ribs. They have a higher fat content, which results in a rich, juicy flavor when grilled, and they often benefit from longer cooking times to break down the tough connective tissues.
- St. Louis Style Ribs: A trimmed version of spare ribs, St. Louis style ribs have a rectangular shape and a meatier surface area. This cut is ideal for grilling because it cooks evenly and can hold up to bold flavors from marinades and BBQ sauces.
- Country-Style Ribs: Technically not ribs but rather a cut from the shoulder, country-style ribs are thick and meaty, making them perfect for grilling. Their robust flavor and tenderness make them a great choice for those looking for a heartier rib option.
- Back Ribs: These are the leftover ribs after a pork loin is removed and are often overlooked. They are less meaty than baby back or spare ribs but still have enough flavor and texture to be delicious when grilled, especially when seasoned well.
How Do Baby Back Ribs Differ from Spare Ribs?
Baby back ribs and spare ribs are two popular choices for grilling, each with distinct characteristics and flavor profiles.
- Baby Back Ribs: These ribs are smaller, more tender, and leaner than spare ribs, making them a favorite for grilling and barbecuing.
- Spare Ribs: Spare ribs are larger, meatier, and contain more fat, which can enhance their flavor during cooking, especially when grilled low and slow.
Baby back ribs, also known as loin ribs, are cut from the top of the rib cage, near the spine, and typically weigh around 1.5 to 2.5 pounds per rack. Their higher meat-to-bone ratio and tenderness make them ideal for grilling, as they cook relatively quickly and remain juicy.
In contrast, spare ribs are cut from the lower portion of the rib cage and can weigh between 2.5 to 3.5 pounds per rack. They have a higher fat content, which contributes to a richer flavor, but they also require longer cooking times, making them perfect for low and slow grilling methods. This fat renders down during cooking, adding moisture and tenderness to the meat.
What Are the Characteristics of St. Louis Style Ribs?
St. Louis Style Ribs are known for their unique cut and cooking style, making them a favorite among barbecue enthusiasts.
- Trimmed Rack: St. Louis Style Ribs are a specific cut from the belly of the pig, trimmed to form a rectangular shape. This trim removes the sternum and cartilage, resulting in a more uniform rack that cooks evenly and is easier to handle on the grill.
- Meat-to-Bone Ratio: These ribs have a higher meat-to-bone ratio compared to baby back ribs, providing a richer and more satisfying bite. The generous amount of meat allows for more seasoning and flavor absorption, making them ideal for grilling and smoking.
- Flavor Profile: St. Louis Style Ribs are often seasoned with a dry rub or marinated before cooking, enhancing their flavor. The fatty layers render during cooking, which not only keeps the meat moist but also adds a depth of flavor that pairs well with a variety of barbecue sauces.
- Cooking Method: These ribs are best cooked using indirect heat on the grill, which allows for slow cooking and tenderization. Techniques like smoking or wrapping in foil during cooking can amplify their tenderness and flavor, making them a favorite for backyard barbecues.
- Serving Style: Typically, St. Louis Style Ribs are served whole and sliced between the bones for easy eating. This presentation emphasizes the beautiful marbling and rich color of the meat, making them visually appealing as well as delicious.
Why Choose Beef Ribs for Grilling?
The underlying mechanism involves the Maillard reaction, which occurs when proteins and sugars in the meat are exposed to high heat. This reaction not only enhances the flavor but also creates a desirable crust on the surface of the beef ribs, allowing for a complex taste profile that is hard to achieve with other cuts. Additionally, the natural collagen found in beef ribs breaks down during slow cooking, further improving the tenderness and making them easier to eat. This combination of flavor, texture, and the science of cooking is why beef ribs are often preferred for grilling.
What Are the Essential Steps to Prepare Ribs for the Grill?
To prepare ribs for the grill effectively, several essential steps must be followed.
- Choosing the Right Ribs: Selecting the best ribs to cook on the grill is crucial for flavor and tenderness. Baby back ribs are popular for their tenderness and quick cooking time, while spare ribs are meatier and have a richer flavor, making them great for grilling.
- Removing the Membrane: It is important to remove the membrane on the bone side of the ribs, as this tough layer can hinder the absorption of flavors and affect tenderness. Use a paper towel for grip and gently slide a knife under the membrane to lift it before pulling it off completely.
- Seasoning: Apply a dry rub or marinade to infuse flavor into the meat. A simple combination of salt, pepper, garlic powder, and paprika can enhance the natural taste of the ribs, while a marinade can add moisture and additional flavor; letting it sit for several hours or overnight is ideal.
- Setting Up the Grill: Preparing the grill properly is essential for cooking ribs evenly. Use indirect heat by turning on one side of the grill and placing the ribs on the cooler side, allowing them to cook slowly and evenly without direct flames.
- Cooking Temperature: Maintaining a consistent temperature between 225°F and 250°F is key for tender ribs. Cooking low and slow helps break down the connective tissue, resulting in juicy and flavorful meat.
- Basting and Wrapping: During the cooking process, consider basting the ribs with sauce or apple juice to keep them moist. Additionally, wrapping them in foil halfway through cooking can help retain moisture and speed up the cooking time, ensuring they are tender.
- Testing for Doneness: Ribs are done when the meat is tender and pulls away from the bone easily. A good test is to use a toothpick or probe to check if it slides in and out with little resistance.
- Resting: After grilling, allow the ribs to rest for about 10-15 minutes before slicing. This step helps the juices redistribute throughout the meat, enhancing flavor and tenderness.
How Should You Trim and Season Your Ribs?
To achieve the best flavor and texture when cooking ribs on the grill, proper trimming and seasoning techniques are essential.
- Trimming the Ribs: Start by removing the membrane from the back of the ribs, which can be tough and prevent seasonings from penetrating the meat. Use a sharp knife to lift the edge of the membrane, then grasp it with a paper towel for a better grip and pull it off in one piece.
- Seasoning Mix: A good seasoning mix typically includes salt, pepper, garlic powder, and paprika, allowing you to enhance the natural flavors of the ribs. You can also add brown sugar for sweetness and cayenne pepper for a kick, creating a balanced flavor profile that complements the smoky taste from the grill.
- Applying the Rub: Generously apply the seasoning mix to all sides of the ribs, pressing it in to ensure it adheres well. Allow the ribs to marinate with the rub for at least an hour or overnight in the refrigerator, which helps to intensify the flavors and tenderize the meat.
- Resting Before Cooking: Let the seasoned ribs sit at room temperature for about 30 minutes before grilling. This step allows for more even cooking and helps the meat to retain moisture during the grilling process.
- Using a Binder: Consider using a binder, such as mustard or olive oil, before applying the seasoning. This not only helps the seasoning stick better but also adds an extra layer of flavor to the ribs.
What Marinades Work Best for Ribs Before Grilling?
The Citrus Herb Marinade is ideal for summer grilling, as the acidity from the citrus juice helps to tenderize the ribs while imparting a refreshing taste that balances the richness of the meat.
For a unique flavor profile, the Asian-Inspired Marinade offers a delightful mix of salty and sweet, making it a great choice for those wanting to experiment with different cuisines on the grill.
The Mustard and Honey Marinade is particularly effective for creating a flavorful crust as it caramelizes during cooking, and the mustard adds a nice tang that cuts through the richness of the ribs.
What Grilling Techniques Ensure Perfectly Cooked Ribs?
The best grilling techniques to ensure perfectly cooked ribs include the following methods:
- Indirect Heat: This technique involves cooking the ribs away from the direct flame, allowing for slow and even cooking. By using indirect heat, the ribs can become tender and juicy without the risk of burning the exterior.
- Low and Slow Cooking: Cooking ribs at a low temperature for an extended period helps break down the collagen in the meat, resulting in a fall-off-the-bone texture. Ideal temperatures range from 225°F to 250°F, which allows the flavors to develop while keeping the meat moist.
- Wrapping in Foil: Wrapping the ribs in aluminum foil during cooking helps retain moisture and enhances tenderness. This method, often referred to as the “Texas Crutch,” can also be used to infuse additional flavors with spices or liquids inside the foil.
- Using a Dry Rub: Applying a dry rub made of spices and herbs before grilling helps to create a flavorful crust on the ribs. The rub not only adds taste but also aids in forming a caramelized bark during the cooking process.
- Basting with Sauce: Basting the ribs with barbecue sauce during the last 30 minutes of cooking helps to create a sticky, flavorful glaze. It’s essential to wait until the end of the cooking process to apply the sauce to prevent it from burning.
- Resting Period: Allowing the ribs to rest after grilling is crucial for redistributing the juices throughout the meat. A resting period of about 10-15 minutes ensures that the ribs remain moist and flavorful when cut into portions.
What are the Ideal Temperature Guidelines for Grilling Ribs?
The ideal temperature guidelines for grilling ribs ensure that they are cooked to perfection, resulting in tender and flavorful meat.
- Low and Slow (225°F – 250°F): This method involves cooking ribs at a low temperature for a longer duration, often taking several hours. This approach allows the connective tissues in the ribs to break down slowly, resulting in tender, juicy meat that easily pulls away from the bone.
- Medium Heat (300°F – 325°F): Grilling ribs at medium heat is suitable for those looking to reduce cooking time while still achieving a good level of tenderness. Cooking ribs at this temperature allows for a nice balance of caramelization on the outside while still allowing the meat to cook through adequately.
- High Heat (350°F – 400°F): This temperature is typically used for a quicker cooking method, such as finishing ribs that have already been slow-cooked or smoked. While high heat can produce a nice char and crust on the ribs, it requires careful attention to prevent the meat from drying out or becoming tough.
- Resting Temperature (160°F – 180°F): After grilling, it’s important to let ribs rest before serving, allowing the juices to redistribute throughout the meat. The internal temperature for ribs should ideally reach around 190°F for optimal tenderness, but they can be served safely at lower temperatures as well.
How Long Should Ribs Be Cooked to Achieve Tenderness?
The cooking time for ribs on the grill can vary based on the type of ribs and the method used, but generally, low and slow is the best approach for tenderness.
- Baby Back Ribs: Baby back ribs typically require about 4 to 5 hours to cook on the grill at a low temperature of around 225°F to 250°F.
- Spare Ribs: Spare ribs take longer to cook, usually around 5 to 6 hours, as they are larger and have more connective tissue that needs to break down.
- St. Louis Style Ribs: St. Louis style ribs, being a trimmed version of spare ribs, also require approximately 5 to 6 hours of cooking time at the same low temperature.
- Country-Style Ribs: Country-style ribs, which are more like pork chops, can be cooked quicker, generally taking about 2 to 3 hours on the grill.
Baby back ribs are smaller and more tender, making them a popular choice for grilling. Cooking them slowly allows the meat to absorb flavor from any rubs or sauces while becoming incredibly tender.
Spare ribs are meatier and have a richer flavor, but they need more time to cook so that the tough connective tissues can break down and achieve that fall-off-the-bone tenderness.
St. Louis style ribs are a favorite for many grill enthusiasts because they have a good balance of meat and fat, which enhances flavor and juiciness when cooked slowly.
Country-style ribs are different as they are cut from the shoulder area and can be cooked at higher temperatures for less time, yielding a juicy and flavorful result without the long wait that traditional ribs require.
What Common Mistakes Should You Avoid When Grilling Ribs?
When grilling ribs, avoiding common mistakes can greatly enhance the flavor and tenderness of your dish.
- Not Removing the Membrane: Failing to remove the silver skin from the back of the ribs can lead to tough and chewy meat. This membrane acts as a barrier to flavor and can prevent seasonings and smoke from penetrating the meat properly.
- Using High Heat: Cooking ribs over high heat can result in burnt outsides and undercooked insides. Ribs benefit from low and slow cooking methods, allowing the fat to render and the connective tissues to break down, resulting in tender meat.
- Skipping the Marinade or Rub: Neglecting to marinate or apply a dry rub can lead to bland ribs. Seasoning is essential to infuse flavor into the meat, and a good marinade can also help tenderize the ribs before cooking.
- Flipping Too Frequently: Constantly flipping the ribs while grilling prevents even cooking and can disrupt the formation of a nice crust. It’s best to let the ribs cook undisturbed for a while to develop that perfect char.
- Ignoring Temperature Control: Not monitoring the grill temperature can result in uneven cooking. Using a meat thermometer ensures that the ribs reach the ideal internal temperature, ensuring they are safe to eat while also being tender.
- Overcooking or Undercooking: Overcooking ribs can dry them out, while undercooking can leave them tough and chewy. Finding the right cooking time and temperature is crucial for achieving that tender, fall-off-the-bone texture.
- Not Letting Them Rest: Cutting into the ribs immediately after cooking can cause juices to run out, leading to dry meat. Allowing the ribs to rest for a few minutes before slicing helps the juices redistribute, enhancing moisture and flavor.
How Can You Tell If Your Ribs Are Overcooked or Undercooked?
To determine if your ribs are overcooked or undercooked, you can look for several key indicators related to texture, appearance, and internal temperature.
- Internal Temperature: The ideal internal temperature for ribs is around 190°F to 203°F. At this temperature, the collagen in the meat breaks down, leading to tender, juicy ribs; if the temperature is significantly lower, the meat may be tough and chewy, indicating undercooking.
- Meat Pull-Back: Properly cooked ribs will show a slight pull-back from the bones, exposing about a quarter-inch of the bone. If there is little to no pull-back, the ribs are likely undercooked, while excessive pull-back may suggest overcooking.
- Bark Formation: A good bark is characterized by a flavorful crust that develops on the outside of the ribs during cooking. If the bark is burnt and dry, the ribs are overcooked; conversely, if the bark is soft and lacks a crust, it may indicate undercooking.
- Flexibility Test: When you pick up the ribs with tongs, they should bend slightly and the meat should start to crack at the surface. If the ribs break apart easily, they may be overcooked, while rigidity suggests they are undercooked.
- Juice Appearance: Juices should run clear when the ribs are cut; if they are excessively pink or red, the ribs are likely undercooked. However, if the meat is dry and the juices are dark, it may indicate overcooking.
How Can You Elevate the Flavor of Your Grilled Ribs?
To elevate the flavor of your grilled ribs, consider the following techniques and ingredients:
- Marinades: Using a flavorful marinade can infuse the meat with moisture and taste before cooking. A combination of acidic ingredients like vinegar or citrus juice, along with herbs and spices, can break down tough fibers and enhance the overall flavor profile of the ribs.
- Dry Rubs: Applying a dry rub made of spices and seasonings can create a flavorful crust on the ribs as they cook. Common ingredients include brown sugar, paprika, garlic powder, and black pepper, which not only provide depth of flavor but also help to caramelize the surface for a beautiful finish.
- Smoking: Incorporating wood chips or chunks into your grilling process can add a rich, smoky flavor to the ribs. Different types of wood, such as hickory, apple, or cherry, impart unique flavors that can complement the meat and enhance the overall taste experience.
- Basting Sauces: Basting your ribs with a sauce during grilling helps to keep them moist while adding additional layers of flavor. A sweet and tangy barbecue sauce or a spicy vinegar-based sauce can be brushed on in the final stages of cooking for a caramelized glaze that enhances the taste.
- Resting Time: Allowing the ribs to rest after cooking is crucial for flavor development. This resting period lets the juices redistribute throughout the meat, ensuring that every bite is tender and packed with flavor.
What BBQ Sauces Pair Best With Ribs?
When grilling ribs, the right BBQ sauce can elevate the flavor profile significantly. Here are some of the best BBQ sauces to pair with ribs:
- Sweet and Tangy BBQ Sauce: This sauce combines sweetness from ingredients like brown sugar or honey with a tangy kick from vinegar or mustard, making it ideal for enhancing the natural flavor of pork ribs.
- Spicy BBQ Sauce: A spicy sauce often includes ingredients like cayenne pepper, hot sauce, or chipotle, providing a bold flavor that complements the richness of beef ribs and adds a satisfying heat to each bite.
- Mustard-Based BBQ Sauce: Popular in some regions, this sauce features mustard as its base, offering a unique flavor that is both tangy and slightly sweet, which pairs exceptionally well with pork ribs, cutting through the fat.
- Tomato-Based BBQ Sauce: This classic sauce is rich and thick, often flavored with spices and sweeteners, making it versatile for both pork and beef ribs, delivering a familiar taste that many find comforting.
- Honey BBQ Sauce: Honey adds a natural sweetness and a glossy finish to the ribs, making this sauce particularly appealing for those who enjoy a sweeter profile; it works beautifully with pork ribs for caramelization during grilling.
- Smoky BBQ Sauce: Infused with smoked ingredients or liquid smoke, this sauce brings a deep, smoky flavor that enhances the grill’s char on beef ribs, making it a perfect choice for those who appreciate layered smokiness.
- Cider Vinegar BBQ Sauce: Common in Eastern North Carolina, this vinegar-based sauce is thin and tangy, providing a bright contrast to the fattiness of the ribs, especially pork, and is often used as a mopping sauce during cooking.