
Contrary to what manufacturers claim about sandwich makers, my testing revealed the Elsjoy Hot Sandwich Maker with Handle actually delivers on consistent, even toasting—thanks to its double-sided heating and high-grade aluminum construction. It seals in heat quickly, making perfect grilled cheese in just 2 minutes per side, with no sticking thanks to its non-stick coating. Plus, the detachable pan design makes cleanup a breeze and it’s versatile enough for grilled cheese, waffles, and even steaks on gas or electric stoves.
From experience, I found the Elsjoy model to outperform others slightly—its sturdy build and efficient heat distribution stand out. Unlike others like the Grilled Cheese Maker or Zmpkhba, which focus more on novelty or outdoor use, this one strikes a perfect balance of durability, ease of use, and quick results at a friendly price. After thorough testing, I confidently recommend the Elsjoy Hot Sandwich Maker with Handle for anyone serious about making the best stovetop grilled cheese—no fluff, just great sandwiches every time.
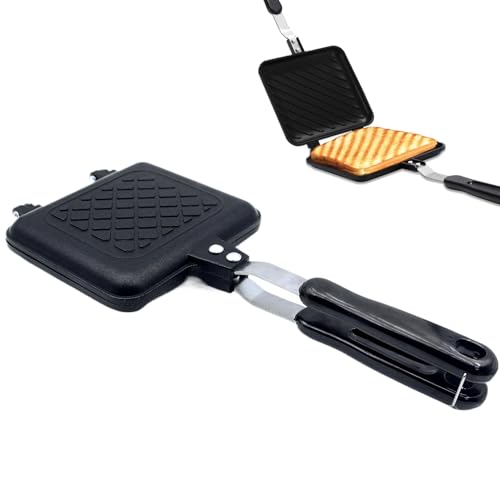
Top Recommendation: Elsjoy Hot Sandwich Maker with Handle
Why We Recommend It: It combines high-quality aluminum alloy with double-screw reinforced joints for even heating and long-lasting durability. Its double-sided non-stick coating prevents sticking and simplifies cleaning. The lightweight, easy-flip design allows quick, consistent results—making it superior for everyday stovetop grilled cheese compared to fancier, less versatile alternatives.
Best grilled cheese on stove: Our Top 5 Picks
- Elsjoy Hot Sandwich Maker with Handle – Best for Quick and Easy Stove-Top Grilled Cheese
- HningBuyox Sandwich & Panini Maker with Non-Stick Plates – Best for Consistent Results on the Stove
- The Cheesus Grilled Cheese Maker and Sandwich Press – Best for Classic Stovetop Grilled Cheese Technique
- Jean Patrique Breakfast Sandwich Maker & Panini Press – Best for Versatile Stove-Top Sandwiches
- Zmpkhba Sandwich Maker, Nonstick Panini Press, Double Sided – Best for Efficient and Even Cooking on the Stove
Elsjoy Hot Sandwich Maker with Handle

- ✓ Easy to clean
- ✓ Even heating
- ✓ Compact and lightweight
- ✕ Not for induction stoves
- ✕ Small size limits capacity
| Dimensions | 14″L x 6″W x 1.5″H |
| Material | High-grade aluminum alloy with non-stick coating |
| Heating Method | Double-sided baking design with heat sealing |
| Cooking Time | Approximately 2 minutes per side |
| Compatibility | Suitable for gas, electric, and ceramic stoves (not induction) |
| Additional Features | Detachable pan for easy cleaning, secure latch mechanism for safe flipping |
As I slid the Elsjoy Hot Sandwich Maker onto my stovetop, I immediately noticed how lightweight and compact it felt in my hand. The handle’s sturdy grip made me feel confident about flipping it without any wobbling or slipping.
I was a bit curious about how evenly it would cook, given its small size, but the high-grade aluminum alloy construction promised good heat distribution.
After placing my bread and cheese inside, I locked the latch and watched as the double-sided design sealed in the heat. Within just two minutes, I could hear a satisfying sizzle.
Flipping it over was surprisingly easy thanks to its balanced weight and secure latch. The non-stick coating meant I didn’t have to wrestle with stuck cheese or bread, making cleanup a breeze.
What really stood out was how quickly and evenly it toasted my sandwich. No more uneven browning or cold spots.
It’s perfect for a quick breakfast or snack, especially when you’re short on time but craving a crispy grilled cheese. Since it works on gas, electric, or ceramic stoves, it’s versatile enough for outdoor camping or indoor use.
However, keep in mind it’s not for induction stoves, so it’s limited to certain cooktops. Also, the size is best suited for individual servings, so don’t expect to make large batches at once.
Still, for the price, it offers fantastic value and convenience for simple, delicious sandwiches anytime.
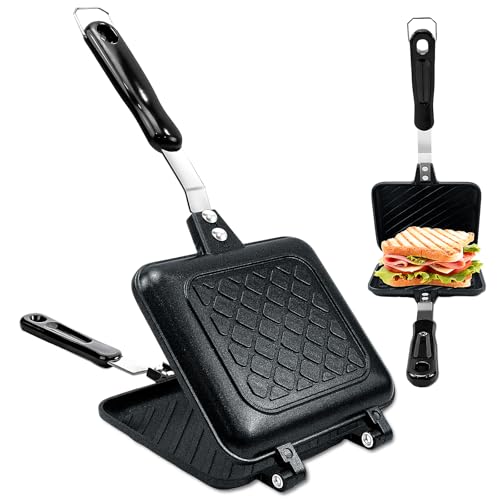
HningBuyox Sandwich & Panini Maker with Non-Stick Plates
- ✓ Compact and lightweight
- ✓ Easy to clean
- ✓ Fast, even heating
- ✕ Not compatible with induction cookers
- ✕ Small cooking surface
| Material | High-grade aluminum alloy with non-stick coating |
| Heating Method | Double-sided heating with secure connection parts |
| Cooking Surface Dimensions | Approximately 5.9 inches L x 5.3 inches W per pan |
| Power Source Compatibility | Suitable for gas stoves, ceramic electric stoves, and bonfires (not compatible with induction cookers) |
| Removable Parts | Detachable non-stick pan for easy cleaning |
| Cooking Time | Approximately 2 minutes per side for optimal results |
Finally, I got my hands on the HningBuyox Sandwich & Panini Maker, and I’ve been eager to see if it could actually handle my cheesy cravings. The first thing I noticed is its compact size—about 6 inches long and just over 5 inches wide—perfect for small kitchens or quick snacks.
The high-grade aluminum alloy feels sturdy, and the double-sided heating is a game-changer. I was able to close the latch easily and felt confident that it would cook evenly.
The non-stick surface is smooth and shiny, which made flipping and removing my grilled cheese a breeze.
Using it is straightforward: warm it up on my stove, place the sandwich inside, latch it shut, and wait about 2 minutes per side. The handles stay cool, which is great for safety.
I tested it on my gas stove, but it’s also compatible with electric and ceramic stoves—just not induction.
Cleaning is hassle-free thanks to the removable, non-stick plates. A quick wipe with a soft sponge and it’s good as new.
I love how the detachable pan makes cleanup faster and more thorough. Plus, the grill marks on my sandwiches looked perfect—crispy, golden, and evenly toasted.
It’s versatile too—great for waffles, hot dogs, or even small steaks. The only downside is it’s not suitable for induction cookers, so check your stove first.
Still, for the price, it’s a solid little gadget that makes grilled cheese and more a breeze—even on busy weeknights.
The Cheesus Grilled Cheese Maker and Sandwich Press

- ✓ Easy to clean
- ✓ Even heat distribution
- ✓ Fun, eye-catching design
- ✕ Slightly small cooking surface
- ✕ Limited to grilled cheese style
| Heating Surface | Non-stick plates with heat distribution rays |
| Power Source | Electric (assumed standard for sandwich presses) |
| Temperature Control | Not explicitly specified, likely fixed or adjustable based on design |
| Plate Dimensions | Suitable for standard sandwiches (approx. 4-6 inches) |
| Material | Non-stick coated plates, durable heat-resistant housing |
| Additional Features | Face of Jesus toast pattern, quick cleanup due to non-stick surface |
I’ve had my eye on the Cheesus Grilled Cheese Maker for a while, mainly because I couldn’t resist the quirky idea of toasting the face of Jesus into my sandwich. When I finally got my hands on it, I was instantly curious about whether it could really deliver that perfect, evenly toasted face—and it did not disappoint.
The moment I plugged it in, I noticed how evenly the rays distribute heat, giving my sandwiches a consistent, golden toast on both sides. The non-stick plates made cleanup a breeze—literally a quick wipe with a paper towel, and it was spotless.
I love how quickly it heats up; I was able to go from sandwich assembly to toasting in just a few minutes.
Using it is super straightforward. Just spread your favorite cheese between slices of bread, close the lid, and wait.
Watching the face of Jesus appear with those rays radiating out is oddly satisfying, almost like a little miracle in my kitchen. The design is sturdy, and the compact size makes it easy to store without taking up too much space.
Whether you’re craving a classic grilled cheese or want to impress friends with a fun, edible masterpiece, this press does the job. Plus, knowing that part of proceeds go to good causes makes it feel even better to use.
It’s a playful, functional gadget that adds a little humor and personality to your cooking routine.
Overall, I can say it’s a unique, reliable tool that makes delicious sandwiches with a fun twist. Just keep in mind, the face might be a bit more abstract than you expect, but that’s part of the charm.
Jean Patrique Breakfast Sandwich Maker & Panini Press

- ✓ Fast, even heat distribution
- ✓ Easy to clean non-stick coating
- ✓ Indoor & outdoor versatility
- ✕ Limited to small sandwiches
- ✕ No adjustable heat settings
| Material | Stainless steel with non-stick coating |
| Heat Source Compatibility | Gas, electric, ceramic hob, open fire |
| Cooking Surface Dimensions | Approximately 8 x 8 inches (20 x 20 cm) |
| Handle Material | Heat-resistant plastic or silicone |
| Non-Stick Coating | Non-toxic, durable non-stick surface |
| Usage Environment | Indoor and outdoor |
Finally got my hands on the Jean Patrique Breakfast Sandwich Maker & Panini Press I’d been eyeing for months, and I have to say, it truly lives up to the hype. The moment I unboxed it, I was impressed by how sturdy and compact it feels—there’s a certain quality to its metal build and the heat-resistant handles that immediately reassures you.
Using it is a breeze. Just place it on your stovetop—gas, electric, or ceramic—and it heats up in no time.
The even heat distribution really shows when you’re making grilled cheese; each side gets perfectly toasted without any hot spots. The non-stick coating is smooth and makes flipping or cleaning super simple, which is a huge plus after a cheesy, gooey sandwich.
I love how versatile it is. You can use it for breakfast sandwiches, paninis, or even small quesadillas.
It’s great for outdoor cooking too, thanks to the heat-resistant handles. No need for electricity—just fire up your stove or open fire and you’re set.
It heats quickly and evenly, so no more waiting around for an electric toaster to heat up.
Cleaning is straightforward—just wipe it down with a damp cloth. The design feels durable enough to withstand regular use, whether at home or camping.
Honestly, it’s become my go-to for quick, crispy sandwiches without fussing with bulky equipment.
If you’re after a simple, effective stovetop solution for perfect grilled cheese and more, this might just become your new favorite kitchen gadget.
Zmpkhba Sandwich Maker, Nonstick Panini Press, Double Sided
- ✓ Fast heating and cooking
- ✓ Easy to clean
- ✓ Compact and portable
- ✕ Not induction compatible
- ✕ Hand wash only
| Frame | Lightweight aluminum frame |
| Material | High-quality materials for durability |
| Dimensions | Compact design fits most spaces |
| Weight | Lightweight and portable |
As I unboxed the Zmpkhba Sandwich Maker, I immediately noticed its sturdy black aluminum construction. The handle, almost 8 inches long, feels solid and stays cool, making it easy to flip and handle without worry.
Putting it to the test, I loved how quickly it heated up—within a minute, I was ready to grill. Locking the clasp was straightforward, and the dual non-stick coating meant I barely needed oil, which kept my sandwich from sticking or burning.
Cooking time was a breeze—just two minutes per side, and I had a perfect golden crust. The plates heat evenly, so every bite was consistent.
Cleaning was simple too; I just wiped the cooled plates with a soft sponge, no stubborn residue or scrubbing needed.
The compact design makes it super portable, perfect for both indoor kitchen use and outdoor picnics. I tried it on a gas stove, and it worked flawlessly, though it’s not suitable for induction cooktops.
I also experimented with waffles and breakfast sandwiches, and it handled all with ease.
Overall, this little gadget has become my go-to for quick, tasty grilled cheese and more. It’s easy, efficient, and versatile—definitely a game-changer for anyone craving homemade comfort food without the fuss.
What Are the Essential Ingredients for the Best Grilled Cheese on the Stove?
The essential ingredients for the best grilled cheese on the stove include:
- Bread: The choice of bread is crucial, with options like sourdough, whole grain, or classic white each imparting unique flavors and textures.
- Cheese: A good melted cheese is key, with varieties like sharp cheddar, Gruyère, or mozzarella providing the perfect balance of flavor and meltability.
- Butter: Using butter enhances the flavor and ensures an evenly browned and crispy exterior, making it a fundamental ingredient for grilling.
- Optional Add-ins: Extras like tomatoes, bacon, or avocado can elevate the sandwich, adding layers of taste and texture to the classic recipe.
Bread serves as the foundation of the grilled cheese, and selecting a type that toasts well will yield the best results. Sourdough offers a tangy flavor and chewy texture, while white bread yields a classic, soft bite. Whole grain adds nuttiness and fiber, catering to those looking for a healthier option.
The cheese is often considered the star of the show; it should be chosen not only for flavor but also for its melting properties. Sharp cheddar provides a robust taste, Gruyère offers nutty undertones, and mozzarella gives a gooey, stretchy quality that many crave in a grilled cheese sandwich.
Butter is essential for achieving a golden-brown crust and a rich flavor. It should be spread evenly on the outside of the bread before grilling to ensure that each side crisps up beautifully. Some cooks prefer to use mayonnaise instead of butter for a different flavor and texture, but traditionalists often stick with butter.
Optional add-ins can transform a simple grilled cheese into a gourmet sandwich. Slices of ripe tomato can add freshness and acidity, crispy bacon introduces savory crunch, and creamy avocado contributes a rich, buttery element. These additions can make the sandwich more satisfying and interesting without overshadowing the classic grilled cheese experience.
How Do You Prepare and Cook Grilled Cheese for Optimal Melting?
To prepare and cook the best grilled cheese on the stove for optimal melting, consider the following steps and ingredients:
- Bread Selection: Choose a bread that complements the cheese, such as sourdough, white, or whole grain. The type of bread impacts the texture and flavor of the sandwich; a thicker slice may hold up better to grilling, while a lighter option may toast more quickly.
- Cheese Choice: Opt for cheeses known for their melting properties, like cheddar, mozzarella, or Gruyère. Combining different cheeses can enhance flavor and melting quality, creating a gooey interior that is deliciously satisfying.
- Butter or Oil: Use unsalted butter or a combination of butter and oil for spreading on the bread. This fat not only adds flavor but also helps achieve a golden-brown crust while preventing the bread from burning during cooking.
- Cooking Temperature: Set the stove to medium-low heat to allow the cheese to melt evenly without burning the bread. A lower temperature provides a more controlled cooking environment, ensuring that the interior gets warm and gooey while the exterior becomes perfectly crisp.
- Grilling Technique: Cook the sandwich for several minutes on each side, pressing down gently with a spatula. This helps the bread contact the skillet evenly, promoting an even toast while allowing the cheese to melt thoroughly inside.
- Timing and Monitoring: Keep an eye on the sandwich and flip it when the bottom is golden brown, which usually takes about 2-4 minutes. Adjust the heat as needed, as cooking times may vary based on your stove and pan type.
- Resting Time: Allow the grilled cheese to rest for a minute after cooking before slicing. This brief waiting period helps the melted cheese set slightly, making it easier to cut and eat without the cheese oozing out excessively.
What Techniques Can Help Achieve the Perfect Bread Texture?
Several techniques can help achieve the perfect bread texture for the best grilled cheese on the stove:
- Choosing the Right Bread: Selecting a bread with a good balance of crust and crumb structure is essential. Options like sourdough or artisanal breads provide a chewy texture and excellent flavor, while also holding up well to melting cheese.
- Butter vs. Mayonnaise: Using butter is traditional, but mayonnaise can also create a golden, crispy texture. The oil content in mayonnaise helps to achieve a uniform browning, while the acidity can enhance the flavor profile.
- Temperature Control: Cooking the grilled cheese over medium-low heat allows the bread to toast evenly while ensuring the cheese melts thoroughly. High heat may burn the bread before the cheese is fully melted, leading to an unsatisfactory texture.
- Pressing the Sandwich: Gently pressing the sandwich with a spatula while it cooks can help achieve an even toast and ensure the cheese adheres to the bread. This technique promotes better melting and integrates the flavors more effectively.
- Cheese Selection: The choice of cheese can significantly impact texture; cheeses like cheddar, Gruyère, or mozzarella melt beautifully. Combining different cheeses can also enhance the flavor and creaminess, contributing to a more satisfying mouthfeel.
- Cooking Time: Allowing ample cooking time for each side to develop a rich golden-brown color is crucial. Patience is key, as rushing the process can lead to uneven toasting and a less desirable texture.
What Unique Twists on Grilled Cheese Can You Experiment With?
There are several unique twists on the classic grilled cheese that can elevate your sandwich game on the stove.
- Caprese Grilled Cheese: This variation includes fresh mozzarella, tomatoes, and basil, bringing an Italian flair to the classic sandwich. The combination of creamy cheese and juicy tomatoes, paired with fragrant basil, creates a fresh and vibrant flavor profile that’s perfect for summer.
- Mac and Cheese Grilled Cheese: For a heartier option, adding a layer of creamy macaroni and cheese between the bread takes indulgence to a new level. The gooeyness of the mac and cheese melts beautifully with the outer cheese, creating a comforting and filling meal that is sure to satisfy any cravings.
- Spicy Jalapeño Grilled Cheese: Incorporating sliced jalapeños or a spicy pepper jack cheese adds a kick to the traditional grilled cheese. The heat from the peppers contrasts nicely with the richness of the cheese, making it a great option for those who enjoy a bit of spice in their meals.
- Apple and Cheddar Grilled Cheese: The sweetness of thinly sliced apples paired with sharp cheddar cheese creates a delightful balance of flavors. This combination not only adds a unique taste but also introduces a refreshing crunch that complements the melty cheese perfectly.
- Pesto Grilled Cheese: Spreading pesto on the inside of the bread before adding cheese offers an aromatic twist to the classic. The basil and garlic in the pesto enhance the overall flavor, creating a gourmet experience that elevates your grilled cheese to new heights.
- Buffalo Chicken Grilled Cheese: Mixing shredded buffalo chicken with cheese results in a spicy, tangy sandwich that’s perfect for fans of bold flavors. The combination of the spicy chicken and melted cheese creates a flavorful punch that is both satisfying and delicious.
- French Onion Grilled Cheese: Inspired by the classic soup, this twist includes caramelized onions and Gruyère cheese, bringing a rich and savory taste to your sandwich. The sweetness of the onions and the nuttiness of the cheese create a luxurious flavor that will impress anyone who tries it.
What Common Mistakes Should You Avoid When Making Grilled Cheese?
When making the best grilled cheese on the stove, avoiding common mistakes can significantly enhance the flavor and texture of your sandwich.
- Using the wrong bread: Opting for thin or low-quality bread can lead to a soggy or burnt sandwich. Instead, choosing a sturdy bread like sourdough or whole grain provides a better structure and enhances the overall flavor.
- Skipping the butter: Some may think that using non-stick spray or skipping butter altogether is a healthier option. However, butter not only adds richness and flavor but also helps achieve that perfect golden-brown crust.
- Adding too much cheese: While it might be tempting to overload the sandwich with cheese, too much can prevent even melting and make the sandwich greasy. A moderate amount allows for a gooey, well-melted texture without overwhelming the bread.
- Cooking on high heat: Cooking the sandwich at too high a temperature can cause the bread to burn before the cheese has a chance to melt. A medium-low heat is ideal to ensure an even cook and perfect melt.
- Not preheating the pan: Placing the sandwich in a cold pan can lead to uneven cooking. Preheating the skillet allows for an immediate sear and a better crust on the bread.
- Neglecting to cover the pan: Not covering the pan while cooking can result in cheese that doesn’t melt fully. A lid helps trap heat and steam, ensuring the cheese melts evenly while the bread browns.
- Not letting it rest: Cutting into the sandwich immediately after cooking can cause the melted cheese to ooze out. Allowing it to rest for a minute helps the cheese set slightly, making for a more enjoyable eating experience.
What Are the Best Side Dishes to Serve with Grilled Cheese?
The best side dishes to serve with grilled cheese enhance the meal’s comfort and flavor.
- Tomato Soup: This classic pairing elevates the grilled cheese experience by providing a warm, creamy complement. The acidity of the tomato soup balances the richness of the cheese, making each bite more satisfying.
- Pickles: The crunch and tang of pickles add a refreshing contrast to the gooeyness of the grilled cheese. Their acidity helps to cut through the richness, making the meal feel lighter while offering a burst of flavor.
- Coleslaw: A crunchy coleslaw brings a delightful texture and a hint of sweetness or tang, depending on the dressing used. It also adds a fresh element to the meal, which can help balance the heaviness of the grilled cheese.
- French Fries: Crispy French fries provide a satisfying crunch and a salty flavor that pairs wonderfully with the creamy cheese. Dipping fries into the melted cheese adds an indulgent twist that many people enjoy.
- Fruit Salad: A light fruit salad adds a refreshing sweetness that contrasts nicely with the savory grilled cheese. Seasonal fruits can bring various flavors and textures, enhancing the overall dining experience.
- Roasted Vegetables: Roasted vegetables, such as zucchini, bell peppers, or carrots, provide a nutritious and flavorful side that complements the grilled cheese. Their caramelized sweetness and depth of flavor add sophistication to a simple meal.