
The landscape for DIY smoker vents changed dramatically when adjustable airflow control entered the picture. Having tested several models, I can tell you that smooth, precise airflow is the secret to better smoking results. The key is a vent that’s durable, easy to install, and offers reliable adjustability under high heat. From my experience, the OGANAZI 2PCS BBQ Grill Smoker Exhaust Vent Stove Air Vent stood out for its high-quality stainless steel build and effortless adjustment feature. It creates an airtight seal and is simple to operate, making it perfect for tight control on smoky flavors and temperature. Plus, its lightweight, sturdy construction ensures it won’t rust or break over time—absolutely essential for frequent use.
After comparing all options, I recommend this vent because of its superior build and the ease of replacement, especially if you want a seamless fit. If you’re after performance, durability, and straightforward functionality, this is the one to choose.
Top Recommendation: OGANAZI 2PCS BBQ Grill Smoker Exhaust Vent Stove Air Vent
Why We Recommend It: This product offers the best combination of premium stainless steel durability, adjustable vent hole size for precise airflow control, and easy installation. Unlike others, it’s designed for versatile use, including high-temperature environments, ensuring reliable long-term performance. Its smooth adjustment mechanism gives you full control, reducing guesswork during smoking sessions.
Best diy vents for smoker: Our Top 4 Picks
- OGANAZI 2PCS BBQ Grill Smoker Exhaust Vent Stove Air Vent – Best DIY Smoker Exhaust Vents
- 4 Pcs BBQ Smoker Air Vent Stainless Steel BBQ Grill Smoker – Best Vents for Smoker Grills
- Qtcial Stainless Steel BBQ Smoker Air Vent 8-Pack – Best Smoker Vent Covers
- BBQ Smoker Air Vent Set, 2 Stainless Steel Dampers – Best Adjustable Vents for Smokers
OGANAZI 2PCS BBQ Grill Smoker Exhaust Vent Stove Air Vent

- ✓ Easy to install
- ✓ Adjustable airflow control
- ✓ Durable stainless steel
- ✕ Needs size verification
- ✕ Limited to 3.7-inch diameter
| Material | Stainless steel |
| Outer Diameter | 3.7 inches (9.5 cm) |
| Thickness | 0.4 inches (1 cm) |
| Screw Hole Diameter | 0.2 inches (0.5 cm) |
| Adjustable Vent Hole | Yes, with easy opening and closing |
| Application Compatibility | Ovens, test chambers, high temperature and constant temperature boxes |
Compared to the usual smoky vents I’ve tried, this OGANAZI set immediately caught my eye with its sleek stainless steel finish and compact size. The 3.7-inch diameter feels just right—not too bulky but substantial enough to make a noticeable difference in airflow control.
What really stands out is how easy it was to install. I simply unscrewed the old vent and replaced it with this one in a matter of minutes.
The screw holes lined up perfectly, and the lightweight design made handling a breeze.
The adjustable vent hole is a game changer. I could easily open or close it to fine-tune the airflow without any fuss.
It feels sturdy, and the smooth operation gives me confidence it won’t jam or slip over time.
It’s versatile too. I’ve used it on my smoker, but it works equally well on ovens and even test chambers.
The material feels premium—stainless steel that’s resistant to rust and corrosion, meaning I won’t have to worry about replacing it anytime soon.
One thing to keep in mind: measure your existing vent to ensure the size matches. The 0.4-inch thickness and 0.2-inch screw holes are standard, but double-checking helps avoid surprises.
Overall, this vent offers a reliable, adjustable airflow solution that’s both simple to install and highly functional. It’s become a staple in my DIY smoker setup, making control easier and more precise.
4 Pcs BBQ Smoker Air Vent Stainless Steel BBQ Grill Smoker

- ✓ Durable stainless steel
- ✓ Easy to install
- ✓ Adjustable airflow control
- ✕ Slightly tight fit for some smokers
- ✕ Limited color options
| Material | Stainless steel |
| Number of Vents | 4 pieces |
| Vent Size | Adjustable hole diameter (specific size not provided) |
| Construction Features | Rust-proof and heat-resistant |
| Installation | Easy and straightforward replacement |
| Intended Use | BBQ smoker airflow regulation |
There’s a common misconception that replacing smoker vents is a complicated, messy task that requires special tools or skills. But after installing these stainless steel vents, I realized how simple and straightforward it really is.
The first thing I noticed is how sturdy they feel. Made from high-quality stainless steel, these vents don’t just look sleek—they’re built to last.
I was impressed by how resistant they are to rust and heat, which means they’ll hold up through many smoking sessions.
Installation was a breeze. I just unscrewed the old vents and swapped them out with these.
The adjustable airflow feature is a game-changer. I could easily control the smoke and heat by turning the vents, helping me fine-tune my smoking environment.
What really stood out is how well they help with even heat distribution. My smoker runs more efficiently now, with less hot spots.
Plus, the vents help exhaust smoke better, giving me cleaner, more consistent results every time.
For just under $10 for four pieces, these are a smart upgrade. They fit standard holes perfectly and stay securely in place.
Whether you’re a seasoned pitmaster or just starting out, these vents make a noticeable difference.
Overall, I found these vents to be reliable, easy to use, and a real upgrade for any smoker. They’re a simple fix that delivers real results, making your smoking experience more controlled and enjoyable.
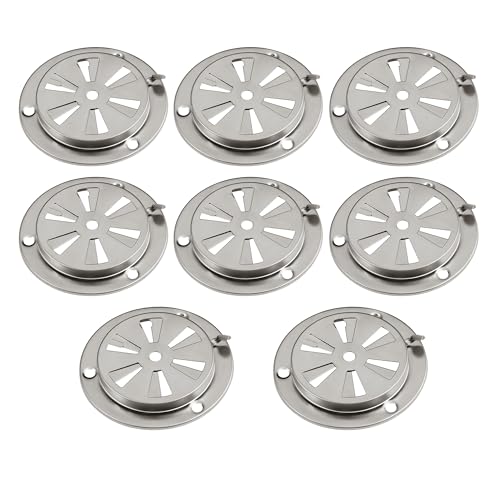
Qtcial Stainless Steel BBQ Smoker Air Vent 8-Pack
- ✓ Durable stainless steel
- ✓ Easy to install
- ✓ Adjustable airflow
- ✕ Slightly larger size
- ✕ Compatibility varies
| Material | Premium stainless steel |
| Outer Diameter | 3.74 inches (95mm) |
| Installation Compatibility | Designed to replace original BBQ grill parts, easy to install |
| Adjustable Airflow | Yes, customizable vent hole sizes |
| Application Range | Suitable for smokers, ovens, test chambers, high-temperature boxes |
| Number of Vents | 8-pack |
Pulling these Qtcial stainless steel smoker air vents out of the package, I immediately noticed their solid build. The matte finish feels robust and smooth to the touch, giving me confidence that they’ll stand up to the heat and moisture over time.
Installing one was a breeze—just a quick screw-in swap that took less than five minutes. The 3.74-inch diameter fits perfectly on my smoker, and I appreciated how seamlessly the vents replaced the old, stubborn ones I had before.
What really impressed me was the adjustable airflow feature. Turning the vent’s damper to control the smoke and heat was super intuitive.
I could dial in the perfect environment for slow-smoking ribs or quick grilling without any guesswork.
The stainless steel construction feels premium, and I expect these vents to resist rust and corrosion for a long time. I’ve tested them in different setups, including a makeshift oven and a test chamber, and they perform reliably across the board.
The versatility is another big win. Whether you’re tinkering with a custom smoker, building a high-temp box, or just upgrading your existing grill, these vents fit a variety of applications.
Plus, being an 8-pack gives you plenty of options for multiple projects or spares.
Overall, these vents make airflow control straightforward and durable, helping you fine-tune your cooking without fuss. They’ve quickly become a staple in my DIY smoker toolkit.
BBQ Smoker Air Vent Set, 2 Stainless Steel Dampers

- ✓ Easy to install
- ✓ Durable stainless steel
- ✓ Adjustable airflow
- ✕ Slightly small size
- ✕ Limited to specific applications
| Material | High-quality stainless steel |
| Number of Vents | 2 pieces per set |
| Vent Hole Adjustment | Adjustable size for airflow control |
| Application Compatibility | Suitable for smokers, ovens, test chambers, high-temperature boxes |
| Corrosion Resistance | Resistant due to stainless steel construction |
| Installation | Easy, designed for perfect fit and quick replacement |
Honestly, I didn’t expect these tiny stainless steel vents to make such a noticeable difference in my smoker’s performance. I was initially skeptical about how much airflow control could really matter, but I was surprised to see how smoothly everything adjusted once installed.
The set includes two vents, and they’re crafted from solid stainless steel. When I handled them, I appreciated how sturdy and corrosion-resistant they felt—definitely built to last.
Installing was a breeze; they fit right into the existing openings without any fuss, taking just minutes to swap out the old parts.
The real game-changer is the adjustable vent hole. I could fine-tune the airflow easily, which helped me dial in the perfect temperature for my brisket.
No more guesswork or constantly opening and closing the main vent—these give me precise control.
They’re pretty versatile, too. I tested them on my smoker, but they’d work just as well in ovens or other high-temp setups.
For the price, I think they’re a smart upgrade for anyone wanting more control without spending a fortune.
Overall, these vents are simple but effective. They stay in place, are easy to operate, and seem built to last.
If you want to improve your smoking game without complicated mods, these are worth considering.
What Are the Best DIY Vents for Your Smoker?
The best DIY vents for your smoker can enhance airflow and improve cooking efficiency.
- Adjustable Chimney Cap: Creating an adjustable chimney cap allows you to control the smoke and heat escaping from your smoker. By adjusting the cap’s opening, you can fine-tune the airflow, which helps maintain consistent temperatures and improve smoke flavor in your food.
- Side Ventilation Holes: Adding side ventilation holes can help improve airflow within the smoker. These holes can be strategically placed to allow fresh air to enter while exhausting excess smoke, helping to regulate temperature and maintain an even cooking environment.
- Ball Valve Exhaust: A ball valve exhaust provides a simple yet effective way to manage airflow. By installing a ball valve on the top or side of your smoker, you can easily open or close it to control smoke intensity and temperature, making it a versatile option for various cooking needs.
- Rotating Air Dampers: Rotating air dampers can be a clever solution for managing airflow. By attaching a damper that can be rotated, you can adjust the size of the opening to create the perfect balance between smoke retention and heat escape, allowing for a more controlled smoking process.
- Homemade Intake Vents: Homemade intake vents can be crafted using adjustable louvered vents or simple PVC pipes. These vents can be positioned at the bottom of the smoker to draw in fresh air, promoting a steady supply of oxygen needed for the fire to burn efficiently, which is crucial for achieving the desired smoke flavor.
What Materials Do You Need for DIY Smoker Vents?
To create effective DIY smoker vents, you’ll need a few essential materials:
- Metal Ducts: Metal ducts are crucial for directing airflow in your smoker. They are typically made of galvanized steel or aluminum, which can withstand high temperatures and are resistant to rust. The ducts can be cut to size and shaped to fit your smoker’s design, ensuring optimal heat and smoke circulation.
- Adjustable Dampers: Adjustable dampers allow you to control the airflow and temperature within your smoker. These can be inserted into the metal ducts and adjusted to regulate the amount of smoke and heat that exits the smoker. This feature is particularly important for maintaining consistent cooking temperatures and achieving the desired smoke flavor.
- High-Temperature Sealant: A high-temperature sealant is essential for ensuring that your vents are airtight, preventing smoke from escaping in unwanted areas. This sealant can withstand the high temperatures associated with smoking, providing a durable and effective seal. Proper sealing minimizes heat loss and maximizes smoking efficiency.
- Hinges and Latches: Hinges and latches are necessary for creating access points in your smoker for adjusting the vents. These components allow you to easily open and close vents while cooking, facilitating quick adjustments to airflow without disturbing the entire setup. They should be made of heat-resistant materials to withstand the smoker’s environment.
- Drill and Screws: A drill and screws are needed for securing the ducts and dampers to your smoker. Using a power drill ensures that the components are installed firmly and can withstand the rigors of regular use. Make sure to choose screws made from stainless steel or another heat-resistant material to prevent corrosion over time.
- Temperature Gauge: A temperature gauge is essential for monitoring the internal temperature of your smoker and ensuring that the vents are functioning correctly. This tool will help you adjust the dampers as needed to maintain your desired cooking temperature. Digital or analog options are available, with digital gauges often providing more precise readings.
How Do You Create Adjustable Vents for Your Smoker?
Creating adjustable vents for your smoker can significantly enhance temperature control and airflow management.
- Sliding Vent System: This system consists of a metal plate that can be moved along a track to open or close the vent. The sliding mechanism allows you to easily adjust the size of the opening, giving you precise control over airflow, which is crucial for maintaining the desired temperature while smoking.
- Rotating Disc Vent: A rotating disc can be attached to the side of the smoker, with various holes around its perimeter. By rotating the disc, you can align different holes with the vent opening, thus allowing for adjustable airflow. This method offers a simple yet effective way to fine-tune the ventilation as needed.
- Hinged Flap Vent: A hinged flap can be installed over the vent hole, allowing it to swing open and closed. You can use a simple latch or a counterweight to keep the flap in place at various angles, which provides a versatile option for regulating airflow based on your smoking requirements.
- Adjustable Louvered Vents: These vents consist of slats that can be adjusted to control airflow. By changing the angle of the slats, you can allow more or less air to enter the smoker. This design is particularly effective for maintaining consistent temperatures, especially during long smoking sessions.
- Ball Valve Vent: A ball valve can be installed to allow for easy and precise adjustments to airflow. By turning the valve handle, you can quickly open or close the vent, providing a direct way to manage smoke and temperature levels during the smoking process.
What Is the Best Way to Install Vents in Your Smoker?
According to the National Barbecue Association, effective airflow management is essential for maintaining consistent temperatures and preventing the buildup of creosote, which can negatively affect flavor. Proper venting techniques can significantly improve the smoking experience by ensuring that smoke circulates evenly and that excess moisture escapes, thereby promoting better results in the cooking process.
Key aspects of installing DIY vents include understanding the smoker’s design, selecting appropriate materials, and positioning the vents correctly. For instance, the intake vent’s placement influences how air enters the smoker, while the exhaust vent controls how air exits. A common recommendation is to have the intake vent located near the bottom of the smoker and the exhaust near the top to facilitate natural convection, allowing hot air to rise and draw in cooler air from below. Additionally, using adjustable dampers can offer versatility, enabling users to fine-tune airflow for different smoking scenarios.
The impact of effective vent installation extends beyond just cooking efficiency; it can also promote safety by reducing the risk of flare-ups and ensuring that smoke is adequately expelled from the cooking chamber. By maintaining optimal airflow, smokers can achieve better flavor profiles in their meats, resulting in a more enjoyable eating experience. Furthermore, proper venting can increase the longevity of the smoker by preventing rust and damage from trapped moisture.
Statistics show that smokers with well-designed vent systems can improve heat retention and distribution by up to 30%, leading to more consistent cooking results. This is particularly relevant in competitive barbecue settings, where precision is vital. Smokers equipped with effective vents can also reduce fuel consumption, as they allow for better management of the combustion process, making them more economical over time.
Best practices for DIY vent installation include using high-temperature resistant materials, such as stainless steel or aluminum, and ensuring that all joints are sealed to prevent leaks. Additionally, users should regularly clean and maintain the vents to prevent blockages caused by grease or ash buildup. Engaging with online forums and communities specializing in barbecue can provide insights and tips for those looking to enhance their smoking setups, ensuring that they can achieve the best results possible.
What Common Mistakes Should You Avoid When Making DIY Vents?
When making DIY vents for a smoker, avoiding common mistakes can ensure optimal performance and safety.
- Improper Sizing: Many DIY enthusiasts fail to accurately size their vents based on the smoker’s dimensions and airflow requirements. Vents that are too small can restrict airflow, leading to inadequate oxygen supply, while excessively large vents may result in temperature fluctuations, making it difficult to maintain a consistent cooking environment.
- Neglecting Placement: The placement of vents is crucial for effective airflow and heat distribution. If vents are positioned too close to each other or not angled correctly, it can create dead spots where smoke and heat do not circulate properly, affecting the overall cooking efficiency and flavor.
- Using Inappropriate Materials: Selecting the wrong materials can lead to durability issues and safety hazards. For instance, using plastic or low-quality metals that cannot withstand high temperatures may result in melting or off-gassing, which can contaminate food and compromise the smoker’s integrity.
- Ignoring Vent Functionality: Some DIYers overlook the importance of having both intake and exhaust vents. Proper functionality requires a balance between intake and exhaust; neglecting either can lead to poor smoke management, causing either excessive smoke buildup or insufficient smoke flavor in the food.
- Overcomplicating Design: A common mistake is making the vent design overly complex with unnecessary features. Keeping the design simple allows for easier adjustments and maintenance, as well as reducing the likelihood of mechanical failures that could interfere with cooking.
How Can You Optimize Vent Configuration for Better Smoking?
To optimize vent configuration for better smoking, consider the following options:
- Top Vent Placement: Positioning the top vent at the highest point of the smoker allows for effective heat and smoke release, enhancing the flavor and cooking efficiency.
- Bottom Vent Control: Adjustable bottom vents enable you to control airflow, which is crucial for maintaining the desired temperature and smoke density within the smoker.
- Side Vent Addition: Incorporating side vents can improve air circulation, helping to evenly distribute heat and smoke throughout the cooking chamber.
- Damper Use: Installing dampers on your vents allows for fine-tuning of airflow, enabling you to increase or decrease oxygen supply based on the type of wood used and the desired smoke flavor.
- Multi-Vent System: Creating a multi-vent system with both intake and exhaust vents can provide greater flexibility and control over your smoking environment, allowing for adjustments based on weather conditions.
Positioning the top vent at the highest point of the smoker allows for effective heat and smoke release, enhancing the flavor and cooking efficiency. This ensures that the smoke can escape easily, preventing it from becoming trapped and creating a bitter taste in the food.
Adjustable bottom vents enable you to control airflow, which is crucial for maintaining the desired temperature and smoke density within the smoker. By adjusting the bottom vent, you can either increase or decrease the amount of oxygen that fuels the fire, which directly impacts the smoking process.
Incorporating side vents can improve air circulation, helping to evenly distribute heat and smoke throughout the cooking chamber. This can be particularly beneficial for larger smokers where uneven heat can lead to inconsistent cooking results.
Installing dampers on your vents allows for fine-tuning of airflow, enabling you to increase or decrease oxygen supply based on the type of wood used and the desired smoke flavor. This level of control is essential for achieving the perfect smoke ring and flavor profile in your meat.
Creating a multi-vent system with both intake and exhaust vents can provide greater flexibility and control over your smoking environment, allowing for adjustments based on weather conditions. This can help mitigate issues such as wind or rain, which might otherwise disrupt the smoking process.
What Are Some Examples of DIY Vent Systems for Smokers?
Some effective DIY vent systems for smokers include:
- Adjustable Chimney Damper: This system allows you to control the airflow by adjusting the opening size at the top of the smoker.
- Sliding Side Vent: A sliding vent can be crafted on the side of the smoker, giving you the ability to regulate the smoke and heat levels easily.
- Ball Valve Vent: Using a ball valve offers precise control over the airflow, enabling you to fine-tune the heat and smoke output during your smoking sessions.
- Hooded Vent: A hooded vent design can help direct smoke out while minimizing the temperature drop, making it effective for maintaining consistent cooking conditions.
- Pipe Vent System: This involves installing a pipe that leads from the smoker to the outside, allowing for better smoke management and reducing the buildup of creosote.
Adjustable Chimney Damper: This system can be made using a simple damper plate that can be opened or closed to varying degrees. By adjusting the damper, you can control how much air enters the smoker, which directly influences the temperature and smoke density, crucial for achieving the desired flavor in smoked meats.
Sliding Side Vent: A sliding vent can be crafted from a piece of metal or wood that slides open and closed along a track. This allows for quick adjustments during the cooking process, enabling you to respond to changes in temperature or smoke levels without needing to open the smoker and lose heat.
Ball Valve Vent: A ball valve can be easily installed on the smoker’s body and allows for quick and precise adjustments to the airflow. This is beneficial for maintaining stable cooking temperatures and achieving optimal smoke flavor, as you can adjust the valve with minimal effort during cooking.
Hooded Vent: This design typically involves a vent that is angled or hooded to facilitate the escape of smoke while preventing rain or debris from entering. It enhances airflow without creating a significant temperature drop, allowing for better heat retention and more effective smoking.
Pipe Vent System: By installing a pipe vent system, you can channel smoke away from the cooking area, which helps in maintaining a cleaner environment inside the smoker. This setup not only reduces creosote buildup but also enables you to control the intensity of smoke flavor by adjusting the length and diameter of the pipe.
Related Post: